Friday, December 31, 2010

New Years Appetizers!

Need another appetizer for this New Years Eve, or tomorrow's football game? Try these spicy
Buffalo Chicken Wings. They've been one of the most popular posts on my blog in 2010. You can cook them on a grill, or in the oven if you happen to be snowed in!
My all time favorite Cheese Ball is a winner. My daughter always requests this during the holidays. If you don't want to roll it in pecans, try chopped parsley.

These Baked Barbecue Meatballs are delicious. They are baked in a homemade sauce-bet you can't eat just one!


My Corn and Black Bean Salsa is also one of my most popular posts. Full of corn and beans of course, but also tomatoes, onion, peppers, cilantro, avocado and lime. This salsa is addictive!
If you need more ideas, please click here for other appetizers.
Happy New Year my friends! May each of you have a wonderful year.


Saturday, December 25, 2010

Merry Christmas!

Merry Christmas, my friends, from our home to yours. Or rather, from our son's home where our granddaughter, is enjoying the boxes and paper as much as the gifts themselves. She was operating solely on adrenaline when we left; too excited to eat, or take a nap.
I hope each of you has had a blessed day!

Monday, December 20, 2010

Pumpkin Gooey Butter Cake from Paula Deen

Do you still need to come up with a dessert idea for Christmas, or like me, a pot luck dinner? We had our annual Christmas pot luck at our church on Sunday and I wanted to whip up something different, so I gave this Paula Deen recipe a try. I've got to tell you I almost backed out of making this when I saw the ingredient list, but decided it was a Christmas dinner after all! Who counts calories at Christmas? This gooey, decadent dessert was a great hit at the dessert table, with hardly a piece left!
I loved the gooey texture and creamy pumpkin flavor. It is really rich though, so rich that my kids didn't really enjoy it. So, I may not make this for my family again, however, the recipe will be in my file for future pot lucks! It is easy to assemble, tastes great and the gooey factor makes it rather decadent, especially when topped with homemade whipped cream!

The recipe has a very high 5 star rating on Paula' site. My photos don't do it justice, but when in a hurry to get to the dinner, this was the best I had time to do. I topped this Pumpkin Gooey butter Cake with whipped cream and dusted it with ground cinnamon. Let me know if you give this recipe a try. Now here's what you do:


PUMPKIN GOOEY BUTTER CAKE - from Paula Deen
Ingredients
Cake layer:
1 18 1/4 ounce package yellow layer cake mix
1 egg
8 tablespoons melted butter
Filling:
1 15 ounce can pumpkin
1 8 ounce package cream cheese, softened at room temperature
3 eggs
1 teaspoon vanilla
8 tablespoons melted butter
1 16 ounce box powdered sugar (yup, you read that right)
1 teaspoon ground cinnamon
1 teaspoon ground nutmeg- I only used 1/2 teaspoon of nutmeg
Preheat oven to 350 degrees.
In a large bowl, combine the cake mix, the egg, and 8 tablespoons of melted butter. Mix thoroughly and pat into a greased 9x13 inch baking pan.
To prepare the filling, beat cream cheese and pumpkin together in a large bowl.
Add eggs, vanilla and butter and combine well. Now add the powdered sugar, cinnamon and nutmeg and mix well.
Spread filling over the cake mixture. Bake for 40-50 minutes. Make sure not to over bake as the center should be a bit gooey. Over baking will also make the bottom layer too dry. Serve with whipped cream and a dusting of cinnamon if desired. Enjoy!


Friday, December 17, 2010

M & M Cookies

These M & M Cookies are almost a guaranteed favorite with kids of all ages. I made some of these cookies, and some Snickerdoodles, a week ago for our church Christmas program and they were a hit. I used the Christmas red and green colored M & M's so the cookies would be festive. I always keep a good handful of the candies out of the mix, and then poke them onto the cookies before they are popped into the oven. This insures that there will candies on the top. This recipe came out of an old church cookbook of mine, like some other of my favorite recipes. M & M cookies were always one of our kids favorite cookies, any time of year. I have other cookie recipes here. I hope you'll give them a try as they are crispy around the edges, but soft and chewy in the center. That's a winner!
Sorry for my blogging absence for the last couple of weeks. My husband and I went on a short trip to Branson, Missouri, and I've had trouble getting back into the swing of cooking regularly, with the trip and the lull after Thanksgiving. But I'm back now, just in time for Christmas. Only one week left! Are you all ready?


M & M COOKIES ( called Party Cookies in my cookbook)
1 cup butter- softened to room temperature
1 cup packed light brown sugar
1/2 cup granulated sugar
2 teaspoons vanilla extract
2 eggs
2 1/4 cup sifted all purpose flour
1 teaspoon baking soda
1 teaspoon salt
1 1/2 cups (3/4 pound) plain M & M candies- I use the whole bag
In a large bowl, mix the butter, brown sugar and granulated sugar together. Beat in the vanilla and the eggs. In another bowl, add the dry ingredients and mix together. Add the dry ingredients to the butter-sugar mixture, about 1/3 at a time. Blend well after each addition. Stir in about half of the candies. Drop rounded tablespoons full of dough on ungreased cookie sheet. Place several candies on each round of cookie dough. Doing this makes sure that each cookie will have M & M's on top. (But you can just dump all the candies in the cookie batter if you prefer).
Bake cookies in a preheated 375 degree oven for 8-10 minutes. Remove from cookie sheets and cool on racks. Enjoy!

Friday, November 26, 2010

What to do with those Thanksgiving turkey leftovers!

Got Turkey? Make a delicious Pot Pie. You can't go wrong with this classic dish.
Or how about Turkey Tetrazzini? This casserole is great with leftover turkey, or even chicken.

Use turkey, instead of chicken, in these yummy Enchiladas with Sour Cream Sauce.
These are just a few ideas to use up your Thanksgiving bird. Have a wonderful weekend my friends!

Sunday, November 21, 2010

Southern Fried Apples

I have great memories of my Grandmother cooking Fried Apples many times when we went to visit her. The kitchen was filled with such a wonderful cinnamony apple aroma that would waft through the kitchen into the rest of the house. They are so quick and simple to make and are delicious with pork and poultry. Apples, cooked in butter, sugar and cinnamon-what could be better? My Grandmother occasionally served Fried Apples for Thanksgiving, and they are also delicious served for breakfast. Make a large batch though, as they are very addictive, and won't last long. My favorite apple to use are Granny Smiths, or other tart apples. This time I used Gala apples, which are a bit sweeter, so I squeezed a bit of fresh lemon over the apples as they cooked. I normally peel the apples before cooking, but was in a hurry and didn't this time. I actually prefer them peeled as the apple skins can be a bit tough after cooking. Granulated sugar or brown sugar can be used and cinnamon is a must. I cooked these for my husband and I for dinner the other night. I should have doubled the amount as my husband devoured them and I had to fight for a portion! So make plenty!

SOUTHERN FRIED APPLES
from Lynda's Recipe Box
I don't usually follow a recipe, but wrote one down this time so I could share. The amount of sugar used will depend on the type of apples used.
1 pound apples (preferably tart), peeled and cored and cut into slices
1 tablespoon butter
2 tablespoons granulated or light brown sugar
1/2 teaspoon ground cinnamon
a squeeze of fresh lemon juice, if desired
In a skillet, melt the butter over medium heat. When butter is bubbly, add the sliced apples into the pan and stir until they are coated with butter. Let them cook a couple of minutes, stirring gently and then add the sugar and cinnamon which has been mixed together. Cover pan with a lid and cook for about 5 minutes. Check apples as they cook rather quickly this way. When the apples are tender, uncover and cook until the juices are thick and bubbly. If there isn't as much syrup as you would like, you may add 1 tablespoon of water to the skillet after you remove the lid, and continue cooking until thickened. Don't stir too much at this point or the apples will fall apart. Total cooking time will depend on the amount of apples you are cooking. These were done in 10 minutes, but a large pan full will take a bit longer. Remove apples to a serving dish. Enjoy!
I think they are best after they cool down a few minutes, and I even love them at room temperature.


Tuesday, November 9, 2010

Chicken Fried Chicken Breasts with Cream Gravy

Sometimes I get really strong cravings for certain foods, especially comfort foods. Fried chicken would be one of the strongest. It was one of my favorite meals growing up, plus anytime I go to the grocery store, the deli is cooking it and the aroma calls to me. But it's not as good as homemade. I don't indulge often, and sometimes when it's just my husband and me, I use boneless, skinless chicken breasts. They are so handy, plus they cook quickly, making this a treat that I can even make during the week. Crisp on the outside, tender and juicy on the inside and topped with cream gravy and mashed potatoes on the side- that's good eating. Let me tell you, this meal satisfied my craving nicely -until the next time, that is. This is more of a method than a recipe, so measurements are approximate. I don't make this often, but this is one of my favorite comfort meals. Enjoy!


CHICKEN FRIED CHICKEN BREASTS with CREAM GRAVY


2 boneless, skinless chicken breasts

1/2 cup flour, seasoned with salt and pepper

1 egg, beaten with 1 tablespoon milk

4 tablespoons oil(could need more, depending on size of skillet-oil should cover the bottom of pan about 1/8 inch deep )


Place each chicken breast between plastic wrap(one at a time) and pound with the flat side of a meat tenderizer, or a rolling pin, to an even thickness. Should be about 1/4-1/2 inch thick. Place on a plate. Place seasoned flour in a shallow bow. Mix egg and milk in another shallow bowl. Season chicken lightly with salt and pepper. Take one piece of chicken and dredge in the flour, shaking excess off. Then it goes into the egg, again shaking off excess. Dredge it again in the flour and lay it on a plate. Repeat with other chicken.

Heat oil in a large skillet over medium heat. When oil sizzles, place chicken pieces in oil and cook until golden and you can see the chicken turning white around the edges, 3-4 minutes. Turn chicken over and continue cooking, another 3 minutes or so. Remove chicken from skillet to another pan. Place in a 200 degree oven to keep warm while you make the gravy.

CREAM GRAVY

Remove all but about 1 tablespoon oil from the skillet, but leave in any brown, crispy pieces from the chicken. Add 1 1/2 tablespoon of flour to the oil and stir, letting the flour cook and brown a about 1 minute. Whisk in about 1 cup milk. Keep whisking as it begins to cook and thicken. The longer it cooks the thicker it will become, so you may need tot add more milk. Season with salt and plenty of pepper. I like lots of pepper in cream gravy. This makes about 1 cup of gravy, so you may need to double it if cooking for more than two or three people.

NOTE: If making mashed potatoes, start them first, before you start the chicken, because they will take longer to cook.

Sunday, November 7, 2010

Butternut Squash Pie

I love baking in the fall. I love the spicy aromas and I guess the comfort foods that I just can't resist. And pie is hard to resist, especially Butternut Squash pie. It tastes like pumpkin pie, in case you've never had it. The first time I ate this delicious pie, my Mother-in-law made it for Thanksgiving. Our boys were confirmed squash haters. They wouldn't eat squash of any kind. So, my MIL made this Butternut Squash Pie, but didn't tell the boys what it was. As they were chowing down, our older son, who was about 9 at the time, said, "this pumpkin pie is sure good Grandma". "Thank you", replied my MIL, with a gleam in her eye. After we were done with dessert, Grandma told the boys they had just eaten squash pie. The look on their faces was priceless!

This pie is a bit of work as I had to cook the squash first. I had 2 small butternut squash to use. To prepare the squash for baking, I first cut off the stem end. You will need a very sharp knife for this. Then the squash is split down the middle and the seeds and strings are scooped out of the squash and then baked on an oiled baking sheet in the oven until tender. Scoop out 1 3/4 cup of sweet, delicious orange flesh and you are ready to begin.

I pureed the squash in the blender, but you can use a food processor if you have one. Add the pie ingredients and pour into a prepared pie crust and bake. Let cool completely. Don't be tempted to cut the pie before it is cool. Top with some fresh whipped cream and you'll have a dessert that is hard to beat! Let me know if you try this pie. Here's how it's made.
BUTTERNUT SQUASH PIE
from Lynda's Recipe Box
Ingredients:
1- 9 inch pie crust- (I made a 9 inch deep dish crust.) or use a pre-made crust
1 3/4 cup of baked butternut squash
1 (12 ounce) can of milk
2 eggs
3/4 cup of granulated sugar
1 1/4 teaspoon ground cinnamon
1/2 teaspoon ground ginger
1/4 teaspoon ground nutmeg
1/4 teaspoon ground cloves
To prepare squash, Cut of the stem end of squash with a sturdy sharp knife. Cut the squash lengthwise in half, and scoop out the seeds and any strings around the seeds. Spray a baking sheet with cooking spray and place squash cut side down on the pan.Place in a 400 degree oven and bake until the squash are tender. The small one took about 40minutes, but larger ones will take longer. When done, remove from the oven and let cool. Scoop out the pulp of the squash, 1 3/4 cup for the pie.The squash can be baked 1 or 2 days before you make the pie.
Place the squash pulp in a blender or food processor. I used a blender, so I added the eggs and pulsed it together. I ended up having to add some of the milk to blend it well. After it is purred, add the remaining ingredients and blend just until incorporated. Pour pie mixture into a prepared pie crust. Bake in a preheated 425 degree oven for 15 minutes. Then reduce the heat to 350 degrees and bake until done, about another 30-40 minutes. Give the pie a shake and if the middle doesn't jiggle it is done. Or, you can test for doneness by sticking a knife in the middle of the pie. If it comes out clean it's done. There may be a few cracks on the surface. Let pie cool completely before cutting. Serve with whipped cream on the side and enjoy. Butternut Squash Pie is delicious! It's a perfect ending to a Thanksgiving meal, or any meal for that matter.
Hope you give it a try!
What's your favorite Thanksgiving dessert?


Tuesday, November 2, 2010

Roasted Sesame and Garlic Green Beans

I have a new favorite green bean recipe now that is bursting with garlic and sesame flavor. I saw a recipe in a Cook's Illustrated magazine which was more involved than I wanted, so I just reduced and eliminated some of the ingredients and just used garlic and sesame for these yummy beans. The garlic is definitely assertive, but it does not over power the sesame seeds. The sesame flavor is very evident, which caused my husband to proclaim these beans as "awesome"! Make your taste buds happy and give these a try!

ROASTED SESAME and GARLIC GREEN BEANS

1 pound fresh green beans, stem ends snapped off
1 tablespoon olive oil
1 teaspoon grated fresh garlic
1 teaspoon sesame seed oil
2 teaspoons sesame seeds, toasted
1/8 teaspoon red pepper flakes
salt and pepper to taste

Heat oven to 450 degrees and line a baking sheet with aluminum foil. Spread beans on foil; drizzle the olive oil over the beans and toss well to distribute the oil. Sprinkle with coarse salt. Roast beans for 10 minutes.
Toast the sesame seeds in a pan for about 30 seconds until fragrant and slightly golden. Mix the sesame oil, red pepper flakes and garlic together. After the beans have roasted for 10 minutes in the oven, remove the pan from the oven. Using tongs, coat the beans with the sesame oil, garlic and red pepper mixture. Spread the beans out and place back in the oven for another 8-12 minutes. Green beans will appear shriveled and have golden brown spots when done. Remove from oven; adjust seasoning and toss with the toasted sesame seeds and serve. Enjoy!

Wednesday, October 20, 2010

Crockpot Applesauce

Here I have another apple post, but I was given about 1/2 of a bushel of fresh from the tree apples so I need to use them. I've had this recipe for Crockpot Applesauce bookmarked since last fall when Barbara posted it. This was the perfect time to try this wonderful recipe. Homemade Applesauce is delicious, and I like mine with a bit of tartness to it. The apples given to me were Red Delicious, which are very sweet and I rarely buy them for that reason, but I added some tart Granny Smith apples to the mix, and the applesauce was amazing. If you haven't ever had homemade applesauce, you are missing a great treat. It is so much better tasting than store bought. Here's how it's made.

CROCKPOT APPLESAUCE
adapted from Barbara Bakes

10 Red Delicious apples

6 Granny Smith apples

1/3 cup granulated sugar

1 1/2 teaspoons ground cinnamon

juice of 1 lemon

1/3 cup water or apple juice

Peel and core the apples and cut into large slices. Place apples in crockpot and add the sugar, cinnamon, lemon and apple juice or water. Stir. Cook on low for about 8 hours, or on high for about 5 hours. Stir a couple of times during cooking. When done, you can mash the apples or puree them to the consistency that you like. I use a potato masher on my applesauce because we like it somewhat chunky. My crockpot apparently cooks faster than some, because my applesauce was done in 3 hours. So I mashed it, placed it in a bowl and let it cool, and put it in containers in the refrigerator. I love it served cold the best. The lemon juice adds a freshness to the apples. It is tart, yet lightly sweet, with the wonderful flavor of cinnamon. It's good!

NOTE: Taste the applesauce while it is hot. If it needs more sugar, it will easily be incorporated while the sauce is warm.

Sunday, October 17, 2010

Delicious Apple Crisp

I love autumn. I love the fresh, crisp air in the mornings, the leaves turning vibrant shades of red and yellow. And I love the foods of autumn, apples being one of my most favorite. Does anything smell better than apples and cinnamon baking in the oven? The aroma in our house as this Apple Crisp bakes is intoxicating! The mix of Granny Smith and Gala apples gives a tart, delicious flavor under the sweet cinnamony topping. I didn't add nuts to the topping this time as my daughter's boyfriend is allergic to nuts. I don't want to make the boyfriend sick! I posted this recipe when I first started my blog almost 2 years ago, and it definitely needed a better picture. This recipe fills a 9x13 inch pan, making it a good size for family gatherings and pot luck dinners. It has graced our Thanksgiving table some years also. I hope you enjoy!

APPLE CRISP
from Lynda's Recipe Box

Topping ingredients:

3/4 cups all purpose flour

3/4 cup old fashioned oats

1 cup light brown sugar

1/2 teaspoon cinnamon

10 tablespoons cold butter

3/4 cup chopped nuts-almonds, pecans or walnuts, optional

In a large bowl, mix the flour, oats, cinnamon and brown sugar together. Cut the cold butter into pieces and work into the flour mixture with a pastry blender until crumbly. Stir in the nuts, if using. Store in the refrigerator until apples are ready.

Apple mixture:

9 cups of peeled, sliced apples-I used Granny Smith and Gala mixed together(use whatever baking apples you have at your location)
1 tablespoon fresh lemon juice
1/3 cup sugar
1 teaspoon cinnamon
1/4 teaspoon nutmeg- optional
Peel and core apples. Slice apples into a large bowl and toss with the lemon juice. Add the sugar and spices and stir; pour apples into a 9x13 inch baking pan. Sprinkle the topping mixture evenly over the apples. Place pan in a preheated 375 degree oven and bake the crisp for 35-40 minutes, until apples are bubbly and the topping is golden. Remove Apple Crisp from oven to a cooling rack. Cool somewhat before serving. It smells so good that it is hard to wait before taking that first bite! Serve it alone, or with ice cream or whipped cream. Enjoy every bite!


Tuesday, October 12, 2010

Panko Crusted Chicken with Mustard Maple Pan Sauce

I love finding tasty recipes to use for boneless-skinless chicken breasts. They are so quick and easy to use for weeknight dinners. This recipe for Panko Crusted Chicken is absolutely delicious with it's tangy Maple Sauce. The Panko is so crusty on this chicken and it does not get the least bit soggy like other breaded chicken. The Maple Pan Sauce is so good, I'd call it a restaurant quality dish. There was so much fabulous flavor from the mustard and the maple syrup that I licked my plate clean! Trust me, you won't want to wast a drop of this sauce. I am going to make it again tomorrow and it's going on my regular recipe rotation. I served it with oven-roasted potatoes, but it would be equally good with garlic mashed potatoes, or even a rice dish. Please try it, you won't be sorry!

Panko Crusted Chicken with Maple Pan Sauce
adapted from bon appetite
Ingredients
4 small chicken breasts, (or 2 large breasts cut in half)
1 large egg
1 tablespoon Dijon mustard
1 tablespoon finely chopped fresh parsley
1 cup panko crumbs- Japanese breadcrumbs
2-3 tablespoons oil-I used canola and olive oil - recipe calls for olive oil
salt and pepper

Sauce Ingredients:
1 cup low sodium chicken broth
2 tablespoons coarse grained mustard
3 tablespoons real maple syrup
1 tablespoon unsalted butter

Preparation:
Using a meat mallet or rolling pin, pound the chicken breasts in a resealable bag, or between 2pieces of plastic wrap. Mix egg, parsley and 1 tablespoon Dijon in a shallow bowl. Sprinkle chicken with salt and pepper. Dip each chicken breast in the egg mixture, and turn to coat. Then dip each piece in the panko crumbs and turn to coat well, pressing crumbs on the chicken. .
Heat the oil in a large skillet over medium heat. Add the chicken; cook until brown and cooked through, about 4 minutes per side.
Meanwhile, whisk broth, syrup, coarse-grained mustard together in measuring cup.
Transfer chicken to plates. Add broth mixture to the skillet; boil until reduced to about 3/4 cup, stirring occasionally. Stir in the butter. Spoon sauce along side the chicken. Enjoy!

NOTE: I reduced the sauce a bit more the second time I made it so it would be more syrupy, but it tastes amazing either way you do it. I have reduced the mustard slightly in this recipe, so check out the link to see the original recipe.

Monday, October 4, 2010

Tuscan Minestrone Soup

The first chill of Fall air blew in finally last week, which overjoyed me, so I made one of my favorite easy soups. This yummy soup is full of healthy veggies and it's very simple to throw together. It uses canned chicken broth and tomatoes, which is a wonderful time saver. After all the vegetables are chopped, the soup only takes about 20 minutes to cook. My husband and I love this stuff, although he prefers some chicken added to it. Either way, this body warming soup is delicious,especially with some crusty bread. This recipe is based on one by Bob Greene, author of The Best Life Diet. Give it a try for a quick, delicious and healthy bowl of soup.

TUSCAN MINESTRONE SOUP
adapted from the book The Best Life Diet

2 tablespoons olive oil

1 small-medium zucchini, diced

1 small-medium yellow summer squash, diced

1 large carrot, finely diced-about 3/4 cup

1 small onion, diced

2 cloves garlic, minced

4 cups canned, low sodium, low fat chicken broth

1 (15 ounce) can of diced tomatoes-I used canned fire-roasted tomatoes

1 (15 ounce) can cannellini beans- I have a hard time finding these in my town, so I sub with Great Northern Beans when I have to.

1/2 cup pasta, elbow or small shells

fresh thyme sprigs, if available

1 teaspoon dried Italian herbs, or use fresh herbs that you have available

salt and pepper to taste

1/4 cup fresh basil, thinly sliced

Heat the oil in a dutch oven over medium heat. Add the carrot, onion, zucchini, and yellow squash to the pan and cook, stirring until the veggies begin to soften, about 10 minutes. Add the garlic and cook until fragrant, about 30 seconds. Pour the chicken broth and tomatoes into the pan, and bring to a boil. Add the beans, pasta and thyme and simmer until the pasta is done, about 10 minutes. Remove the thyme sprigs and season soup with salt and pepper. Stir in the fresh basil. Top each serving with freshly grated Parmesan cheese. Enjoy! Makes about 6 servings.

NOTE: I use whatever herbs I have available, oregano, basil and thyme. My thyme plant died in the heat this summer, so I used 1/2 teaspoon dried in this recipe. I also used 1 tablespoon fresh oregano in place of the teaspoon of dried herbs. Also, sometimes I have to use more chicken broth, depending on the size of squash used. Original recipe calls for medium sized squash.

Friday, September 24, 2010

Pineapple Upside Down Cake

Oh my, I didn't mean to take such a long blogging break and not tell you that I'd be gone. I've been to a ladies retreat at Lake of the Ozarks for a few days where I didn't have to cook, or do dishes or clean anything. So when I returned home, I really didn't want to cook, wash dishes or clean anything. It was too nice having those things done for me! I have tried a couple of new recipes, but did not care for them, so I didn't want to blog about food I did not like. But now I have a real tasty dessert for you.

I have never made a Pineapple Upside Down Cake before, but I had purchased a fresh pineapple on sale several days ago and thought I'd use some of it in this cake. It was so good! The sweet, gooey brown sugar and butter topping along with the pineapple and pecans really make this classic cake. I placed the pineapple slices tightly together when arranging the topping, but the fruit shrinks some as it bakes, so next time I'll squeeze the pineapple in closer. I don't care for Maraschino Cherries, which are typically used in this cake, so I used pecan halves instead. The cherries are prettier, but the pecans taste better to me. I found this recipe at Joy of Baking, and she gives some interesting information about this classic recipe. I did not follow her directions for cooking the topping longer, because the topping will be cooking in the oven for so long. It turned out perfect with the shorter cooking time. The cake is sturdy, but has a fine texture and of course the topping is so gooey and delicious. It was even better on the second day. I used fresh pineapple, but canned may be substituted, if desired. Hope you give it a try!

PINEAPPLE UPSIDE DOWN CAKE
adapted from Joy of Baking

Preheat the oven to350 degrees F and place oven rack in the center of the oven. Spray a 9 inch round baking pan with cooking spray.

TOPPING:
4 tablespoons unsalted butter
3/4 cup light brown sugar
1medium pineapple, peeled, quartered and sliced( or canned pineapple slices)
Maraschino cherries or pecans

Place the butter and brown sugar in a sauce pan and heat until hot and bubbly. Pour sauce into the prepared 9 inch round pan. Arrange the pineapple and pecans in the pan. Prepare the cake batter.

BATTER:
1 1/2 cups all purpose flour
2 teaspoons baking powder
1/4 teaspoon salt
1/2 cup ( 8 tablespoons, or 113 grams), unsalted butter, room temperature
1 cup granulated sugar
1 teaspoon pure vanilla
2 large eggs, separated
1/2 cup milk
1/4 teaspoon cream of tarter

In a large bowl, beat the egg whites and the cream of tarter until the whites will hold a stiff peak. In another bowl, beat the sugar and butter with an electric mixer until light and fluffy. Add the vanilla and egg yolks and beat well. Add the flour mixture in (3 additions), alternately with the milk (in two additions), ending with dry ingredients, scrapping down the sides as you mix. Gently fold half of the beaten egg whites into the flour mixture. Fold in the remaining egg whites, and pour the batter into the cake pan over the topping mixture. Gently smooth the top. Bake at 350 degrees for 45-50 minutes, or until a toothpick inserted into the cake comes out clean. Place on a wire rack to cool about 5 minutes. Run a knife around the edge of the pan and carefully invert the cake onto a serving plate. Cool completely. Enjoy!

Thursday, September 9, 2010

Peach Galette

I love fruit pies, but I don't like making them. Don't get me wrong, I do occasionally make a pie, but they can be rather time consuming, and I'm an impatient cook. But I love buttery, flaky crust and fresh, in season fruit together. This past week I purchased some humongous, juicy, Missouri peaches at the farmer's market, and knew I'd have to make a pie. They aren't the first peaches we've had, but the others have ended up sliced over ice cream, or just eaten out of hand. I wanted pie this time, but maybe a galette instead. A galette is less intensive to make since you only need the bottom crust. It is also known as a crostata, or a rustic fruit tart. There's even the option of using refrigerated pie crust from the store. But I wanted to make my own crust for these amazing, juicy peaches. And the peaches were so juicy that the crust on my galette leaked, a lot. Even then, there was still plenty of juice left in the pie. Actually, I've made two of these this week; one was peach and blueberry. Both were fantastic and my husband is practically begging for another. Hmmm, I think apple will be next!
Roll out the crust to about 13 inches in diameter. Top with sliced peaches that have been sweetened. Keep them in the center with about 3 inches of an edge all the way around.

Fold over the edges and just kind of pleat the crust and pinch the pleats together. Sprinkle with a little sugar if desired. Bake until the crust is golden. Let it cool! There is so much juice that you'll lose a lot if you cut it too soon. Here's the recipe.

PEACH GALETTE
from Lynda's Recipe Box
CRUST:
1 1/4 cup flour
8 tablespoons (1 stick) unsalted, cold butter, cut into smaller cubes
1/4 teaspoon salt
4-6 tablespoons ice cold water
In a bowl mix the flour and salt together. Add the cold butter and cut into the flour with a pastry blender. If the butter gets warm, chill the flour mixture before adding the water. Add 4 tablespoons of ice water and quickly work into the crust to bring it together into a ball. Add more water if needed. Don't overwork the crust. Place crust on plastic wrap and flatten it into a round disk.Wrap tightly and place in the refrigerator for at least an hour. When ready to form the crust, take it out and let it set on the counter for about 20 minutes. Flour a work area and roll crust into a 13 inch circle. Line a baking sheet with parchment paper. Transfer the crust to top the parchment paper.
PEACH FILLING:
2/12 - 3 cups of fresh peaches, peeled and sliced- or other fruit or berries
1 tablespoon fresh lemon juice
1/2 cup granulated sugar
1/4 teaspoon ground cinnamon
2 tablespoons cornstarch
Mix the cornstarch, cinnamon and sugar together in a bowl. In another bowl slice the peeled
peaches into large slices. Sprinkle the peaches with the sugar mixture and mix together. Spoon the peaches onto the center of the rolled out crust. Fold the crust over the fruit and pleat it together. You can sprinkle sugar on the crust, if desired. Bake in a preheated 400 degree oven for 40 - 50 minutes, or until the crust is golden. Remove from oven and cool. Enjoy with ice cream or whipped cream!
NOTE: Be sure to measure your crust; if it is smaller than 12 inches, you'll need to use less fruit.

Monday, September 6, 2010

Fried Summer Squash ( My Weakness)

I hope that everyone has had a wonderful Labor Day Weekend! Ours has been rather lazy, but sometimes it's nice to have a slow day. My husband is now well, as is our granddaughter, so life is back to normal.
Recently I gave in to a life long craving-pan-fried squash. You see, as I was growing up, my mother grew yellow summer squash in her garden and the only way she prepared it was to bread it with egg and cracker crumbs and fry it in butter. It was a family favorite. It was many years later before I had squash prepared any other way. As I've gotten older, I rarely ever fry squash anymore, maybe once or twice each summer. I still love it, I just try to not eat very much fried food because of the artery clogging capabilities that we all hear about. But I have to indulge once in a while, and last week it was time! I've also fried zucchini this way with delicious results. This isn't really a recipe, but a method for you to follow. I'm sure many of you have eaten it prepared this way.

FRIED SUMMER SQUASH
from Lynda's Recipe Box

Squash, yellow or zucchini- I used 2
Finely crushed saltine crackers-I start with a cup
salt and pepper added to the crumbs
1 egg, well beaten
oil and butter for frying-amount depends on the size of skillet used

Use small squash as larger ones may be tough and have large seeds. Wash squash and dry with paper towels. Slice each squash into uniform slices. I like it about 1/2 inch thick.
Heat a large skillet over medium heat. Add oil and 1 or 2 tablespoons butter. The grease needs to be about 1/4 inch thick if the squash is 1/2 inch thick.
Dip each slice of squash in egg; shake off the extra and then dip into the cracker crumbs. Place squash into the hot oil. Repeat with each slice, but don't crowd the pan. If crowded, the breading will stick to other squash and pull of when you turn it. When golden, turn it over and fry until the other side is browned. Remove squash from skillet and drain on a paper towel lined plate. Serve and enjoy!
Delicious- I thoroughly enjoyed every calorie and fat gram!

Wednesday, September 1, 2010

Stacked Chicken Enchiladas - an easy cassarole

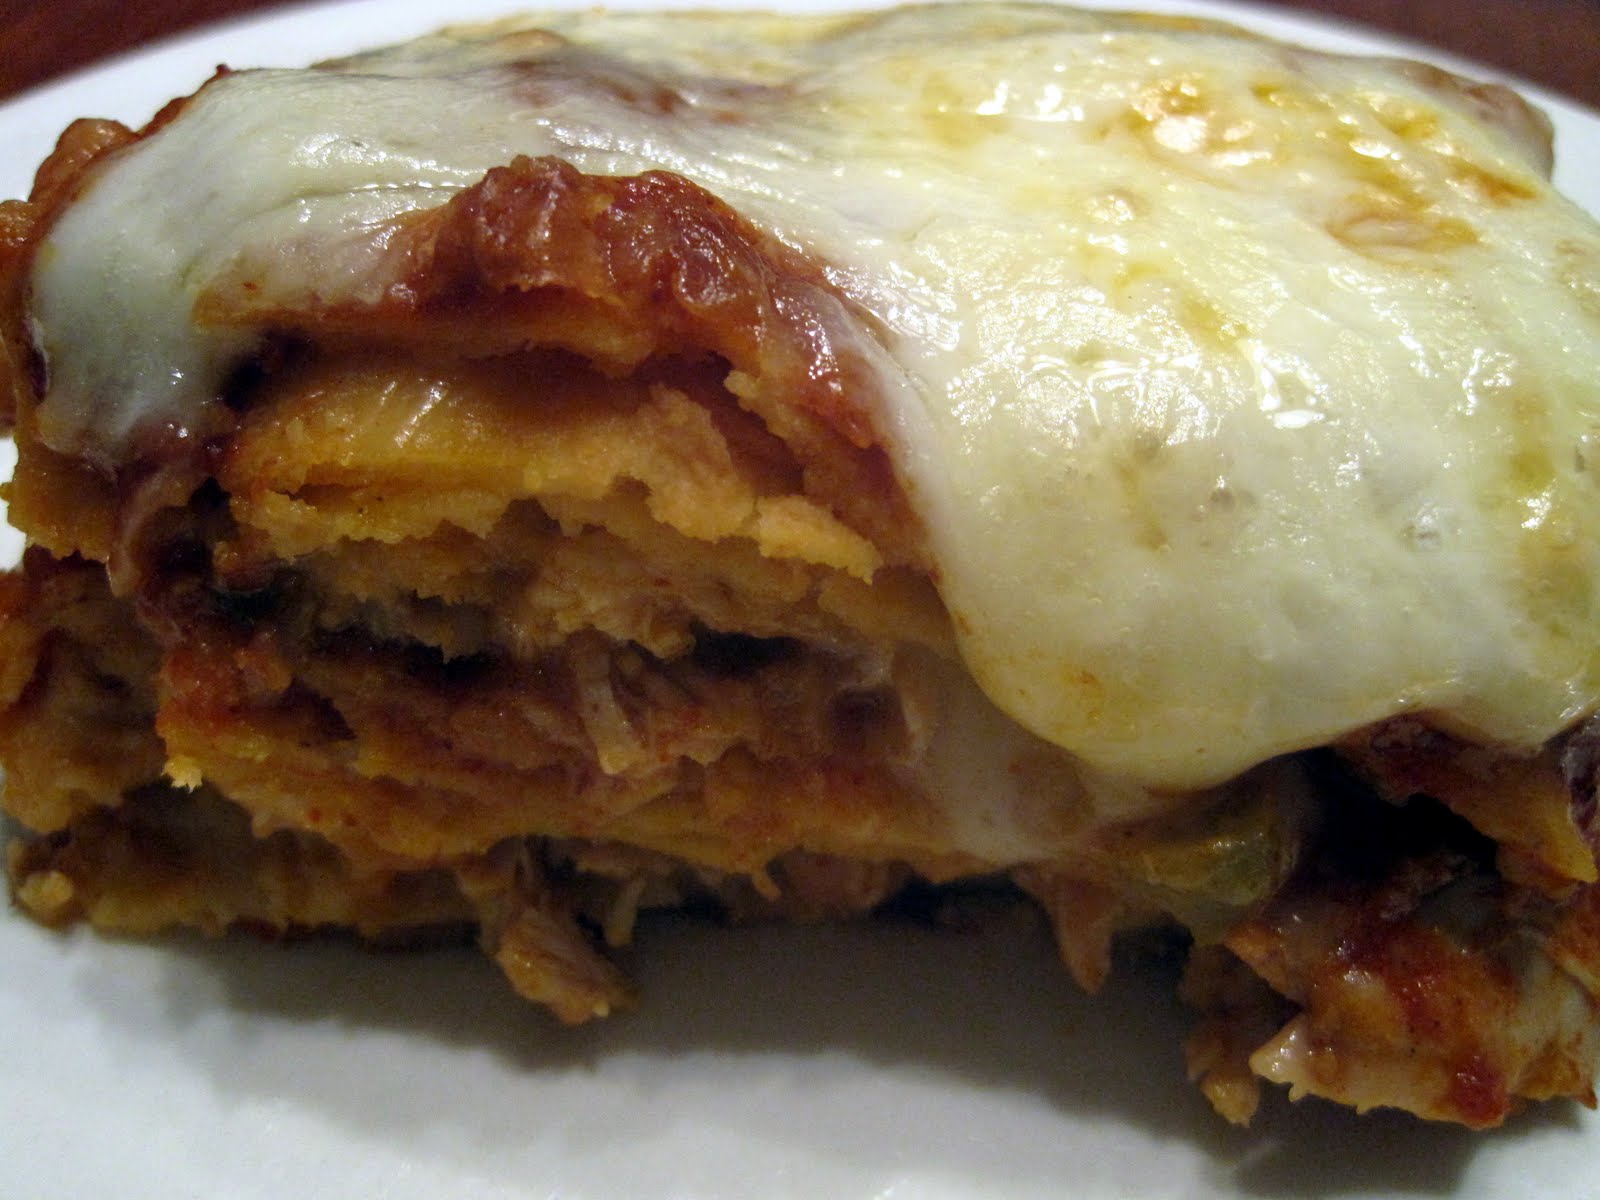
My week has been busy with an ill granddaughter to help with, and then my husband got sick, so I really haven't cooked much. I hope next week is healthier. But I do have a recipe to share. Would you like having a yummy chicken enchilada casserole recipe that is fairly easy to throw together? A rotisserie chicken is called for in this recipe, which cuts down quite a bit in the casserole's preparation. Of course, you can used leftover baked chicken, or even turkey, if desired. A delicious, spicy, but mild sauce is layered between roasted chicken, corn tortillas and Monterrey jack cheese and baked for 15-20 minutes, which makes it easy enough even for a week night meal. This is supposed to be a 30 minute meal from Cook's Country, but I went over a few minutes. I like the smaller size of this casserole as it's not so huge for a smaller family. But it packs plenty of flavor! My husband prefers actual enchiladas to this casserole, but I don't always have time to make them. This dish is a delicious substitute, so I hope you'll give it a try.

STACKED CHICKEN ENCHILADAS
adapted from Cook's Country
1 tablespoon canola oil
1/2 onion, chopped fine
3 tablespoons chili powder
2 teaspoons ground cumin
2 (8-ounce) cans tomato sauce
3/4 cup low sodium chicken broth
1/2 teaspoon salt
1 (4-ounce) can of chopped green chilies
1 rotisserie chicken, skin discarded and meat shredded ( about 3 cups of meat)
2 cups shredded Monterrey Jack cheese-recipe calls for Mexican cheese blend
12 (6 inch) corn tortillas
1. Place an oven rack in middle of oven and preheat oven to 400 degrees. Heat oil in a large saucepan over medium high heat and saute onion until soft, about 5 minutes. Add chili powder, and cumin and cook until fragrant, about 30 seconds. Stir in the chicken broth, salt and tomato paste. Cook until slightly thickened, about 5 minutes. Cover and keep warm.
2. Toss the chicken, 1/4 cup sauce, 1 cup cheese and green chilies in a bowl. Tortillas are supposed to be softened in a microwave, but mine were fresh and soft, so I skipped this step.
Now, spread 1/2 cup of sauce in the bottom of an 8x8 inch baking dish. Lay 4 tortillas over the sauce in the baking dish. Cover the tortillas with half of the chicken mixture.. Top chicken layer with 4 more tortillas, and then cover with half of the sauce mixture. Cover with remaining chicken mixture, then the last 4 tortillas, and the rest of the sauce. Cover with the remaining 1 cup of cheese.
3. Place a piece of foil tightly over the baking dish and bake about 15 minutes until heated through. Remove the foil and bake until the cheese is lightly browned, about 5 minutes. I let it cool about 10 minutes before serving. Enjoy!
NOTE: If you prefer a spicier dish, you can used pepper jack cheese as a substitute.

Tuesday, August 24, 2010

Korean Beef Rice Bowl

I saw this dish recently at Steamy Kitchen and wanted to try it soon, and I'm so glad I didn't wait! My photo isn't as good as Jadens, but the meal was certainly excellent. Once you have all the vegetables chopped and the beef sliced, this meal comes together in just minutes. That is if you are not working around a 14 month old granddaughter who is trying to pull stuff out of your cabinets. She didn't take her planned nap, so meal preparation was a bit challenging, to say the least, with a very active and curious toddler around. But back to this meal- it's one of those lick the bowl clean type of dishes. Judging by the groaning that was coming from my husband, I knew he loved it. The sauce that the beef is marinated in is delicious; sweet but yet it's got so much flavor from the garlic and fresh ginger. I've got to make it again this week because it keeps calling my name! Here's what I did.

KOREAN BEEF RICE BOWL
slightly adapted from Steamy Kitchen

2 cups dry rice, your preference, cooked

1 pound beef, I used top sirloin, sliced thin

2 tablespoons soy sauce-I used low sodium

2 teaspoons sesame oil

1 teaspoon grated ginger

1 clove garlic, minced

1 tablespoon brown sugar 1 tablespoon cooking oil

1/2 of an onion, diced

1/2 cup of carrots cut into matchsticks -recipe calls for 1 cup

1 small zucchini, diced

2 handfuls of fresh spinach

1 tablespoon of toasted sesame seeds

Directions:

Put your rice on to cook first, using whatever kind you like. The vegetables can be prepared a day ahead if desired. If doing them at time of meal, have them chopped before you begin cooking. Slice beef very thin, across the grain. It can be prepared several hours in advance also.
Mix the minced garlic, grated ginger, sesame oil and brown sugar together in a bowl. Pour over the beef and let marinate.
Heat a wok or skillet to medium heat. add the 1 tablespoon oil and the onion and cook for a couple of minutes. Turn up to high heat, add beef and cook until barely an pink left. Add the carrots and zucchini and stir fry for about 1 minute. Add the spinach and cook just until wilted. Stir in the toasted sesame seeds. Serve this over rice. Enjoy!

Wednesday, August 18, 2010

French Toast with Blueberry Sauce

I had a craving for French toast this week, and I also had some blueberries that either needed to be used or put in the freezer. This recipe for French Toast came out of one of my Mother's cookbooks and I've used for years. I prefer using French Bread or a similar bread as it has a firmer texture after being cooked than sandwich bread does. This time I used Walmart's french bread since there were no better options from my store. It works very well for this recipe though. Slice the bread on the diagonal, about 1 inch thick, dip it in the egg mixture and turn over and dip other side. This bread soaked up the custard quickly, but a coarser bread may need a bit longer. The egg mixture is easy to increase if you need to make more quickly. I use one egg to 1/3 cup of milk. I doubled that this time and got 8 slices of bread out of it. This will fluctuate, depending on the bread you use and whether or not you let it soak. We enjoyed this treat for breakfast, but of course it's good anytime of day. Here's my method.

BLUEBERRY SAUCE

1 pint of fresh or frozen blueberries (2 cups)

2/3 cup granulated sugar

3/4 cup water

1 tablespoon fresh lemon juice

1 tablespoon cornstarch

Add berries, sugar and water to a heavy bottomed sauce pan and bring to a boil. Reduce heat and simmer about 10-15 minutes. Mix the cornstarch and lemon and add to the berries, stirring quickly so the cornstarch is incorporated. Cook for 1 minute longer, until sauce is thickened. Remove from heat. Sauce will thicken more as it cools.
NOTE: This sauce is also delicious as a topping on ice cream or served with lemon or pound cake!

FRENCH TOAST

1 inch slices of french bread, or bread of choice

2/3 cup milk

2 large eggs, well beaten

pinch of salt

1/4 teaspoon ground cinnamon

1/4 teaspoon vanilla

Heat oven to low heat and place a baking sheet with a metal cooling rack on it, in the oven. This is needed if you are cooking several batches of French Toast, so that the toast will stay hot and crusty on the outside.
Mix together all ingredients in a bowl.
Heat a large skillet or griddle over medium heat. I use my electric griddle on 325 degrees, or sometimes my cast iron griddle for smaller amounts.. Melt 1 tablespoon of butter in the pan. Take 1 slice of bread and lay it in the egg mixture, turn over on the other side, and hold it up and let the excess drip off. Place soaked bread in the pan. Repeat with more bread, but don't crowd it in your pan. Cook the bread until golden and then turn over. Adjust the temperature of you griddle if necessary. When done, place the cooked french toast in the oven to stay warm, and finish cooking the rest.
To serve, slather with butter and top with Blueberry Sauce, or maple syrup. Mmmmm, this is amazingly good and will put you in a great mood the rest of the day! Enjoy!
Whats your favorite topping for French Toast?

Monday, August 16, 2010

BLT Sandwiches with Avocado and Red Onion

The continuing blazing hot weather has left me with little desire to actually cook. I know I'm not the only one struggling here, so sandwiches, salads and one pan meals are all I've been making. I'm just trying to keep the house cool, so I don't use the stove anymore than I have to. Bacon, lettuce and tomato sandwiches are always good when you have some juicy homegrown tomatoes to use. I decided to add avocado and red onion slices to it and the sandwich was even better.
Of course, you don't need a recipe for this.
All you need is 2 slices of bread, toasted- or not if you prefer
several slices of crisp bacon
sliced tomatoes
thin onion slices
avocado slices
mayonnaise
Assemble sandwich and devour!
What do you like to eat when the temperatures soar to 100 degrees?

Wednesday, August 11, 2010

The Best Blackberry Cobbler!

According to my family, this is the best cobbler ever. I've tried others but my family has always wanted this one. I found this recipe in an old church cookbook that I have had for about 35 years and it never fails to please. I have used wild blackberries in this cobbler that my daughter's boyfriend picked for me from his grandfather's farm. Such a nice young man don't ya think!
Anyway, this cobbler is delicious. The topping is thick when stirred together and then it is spooned evenly over the hot fruit. It may not look like there is enough topping, but as it bakes it rises and spreads across the berries. When done, the topping is crusty on top, and sweet, buttery and dense underneath. It is not biscuit like. Whether served as is, or with a scoop of vanilla ice cream, this blackberry cobbler is a winner. You may of course use other berries. The topping is sweet, so I use less sugar in the blackberries, leaving them somewhat tart to balance out the sweetness of the topping. But go by your own tastes. Other berries may take more, or less sugar. Here's the recipe.

THE BEST BLACKBERRY COBBLER!

You will need;
3-4 cups fresh or frozen blackberries, thawed (any juices saved)
1 cup juice from the berries, or water or combination of both (See note below)
1 tablespoon cornstarch
1/3 cup sugar- more if fruit is too tart(you need to taste it after fruit and sugar is mixed)
Mix the juice and cornstarch in a large saucepan. Add fruit and sugar and heat until it begins to thicken. Pour into a 9x9x2 inch baking dish.

Topping;
1 cup sugar
1 cup flour
1 teaspoon baking powder
1 egg, slightly beaten
1 stick (1/2 cup) butter, melted
Mix all ingredients together well. Mixture will be thick. Spoon evenly over the fruit in the baking dish. Bake at 350 degrees for about 40 minutes, until the topping is done. Insert a toothpick into the topping; if it comes out clean, except for juice, it is done. If the topping still seems gooey, then bake a few minutes longer, and test again. Enjoy!

NOTE: When using frozen berries that have thawed, you will have juices that you need to save to use in the filling. When using fresh berries, you may not have enough juice to use, so then you will need to use water in place of juice.

Wednesday, August 4, 2010

Greek Style Couscous Salad

It is so hot here that I haven't been cooking much. When it's 100 degrees out side I'm not really inspired to add very much heat to the house, just so we can eat. Thankfully this salad was so quick. I've also made it with lemon garlic chicken sliced on top for a main dish salad. It is delicious and I'll be making it as long as this heat stays, and longer. I used Far East brand of couscous, which is one of the few that are available here. I used the plain couscous, but the flavored ones would work too, I'm sure. Here's how I made it.

GREEK STYLE COUSCOUS SALAD

1 package (7 ounce)of Far East plain, couscous
Cook couscous according to package directions. I added salt and pepper to the water. Bring the water to a boil; add the couscous and remove from heat. Cover and let sit for 5 minutes.
Mix together 2 tablespoons of fresh lemon juice and 2 tablespoons of olive oil. Pour over couscous and fluff with a fork. Cool.
Add;
1 cup, or more, diced cucumber -seeds removed
1/2 cup diced red onion
1 diced tomato
chopped fresh herbs-I used about 1 T. basil and flat leaf parsley together
Stir ingredients together and chill before serving. Top with Feta Cheese. Enjoy!

NOTE: This would also be good with zucchini, peppers or olives.

Monday, July 26, 2010

Garden-Fresh Chicken and Rice

To me, chicken and rice is comfort food. I saw this recipe in Cook's Country and decided to try it even though it had so few ingredients. I wondered how good it would really be. The rice is partially cooked in chicken broth in the microwave, while the chicken breasts are sauteed in butter in a skillet. The two are then combined with the vegetables in the pan and it truly is a 30 minute meal. This dish is easy, delicious and is perfect for a busy weeknight meal. It is a very satisfying meal for a family. I've made it twice so far, because I like it and my husband requested it again. So therefore I share it with you. Hope you enjoy! GARDEN - FRESH CHICKEN AND RICE
slightly adapted from Cook's Country

2 cups low-sodium chicken broth
1 cup long grain white rice
salt and pepper to taste
4 boneless, skinless chicken breasts, all about the same size (about 1 1/2 pounds)
3 tablespoons unsalted butter
2 small zucchini, halved lengthwise and sliced thin
1 cup carrots, sliced thin- recipe calls for fresh or frozen corn kernels
3 green onions, sliced thin
1/2 teaspoon dried thyme, my addition

1. Combine rice, 1/2-3/4 teaspoon salt and 1 cup chicken broth in a large microwave safe bowl. Cover tightly with plastic wrap and microwave on high for 6-8 minutes, until the broth is completely absorbed. While rice is cooking, pat chicken dry with paper towels. Season with salt and pepper. Melt 2 tablespoons of butter in a large heavy bottomed skillet over medium heat. Cook chicken until golden on each side, about 3 minutes per side. Transfer chicken to a plate.

2. Melt remaining 1 tablespoon butter in the empty skillet. Cook zucchini and carrots, or corn, until browned, about 3 minutes. Don't overcook the zucchini.. Transfer the vegetables to a bowl. Now add the partially cooked rice and the remaining 1 cup of broth to the pan, along with the thyme if using, and bring to a boil. Reduce heat to low and return the chicken back to the pan with the rice. Cover and simmer until rice is tender and chicken is cooked through, about 12-15 minutes. Transfer chicken to a plate and add the vegetables back to the pan with the rice. Stir into the rice along with the green onions. Plate the rice and vegetables. Thinly slice the chicken breasts and serve atop the rice mixture. Enjoy!

NOTE: The butter is essential in the recipe, in my opinion. The chicken and rice both get much flavor from it, so I don't think it would be a good idea to use oil. Maybe if you included some herbs, it would work. The thyme I added was good, but not really necessary, because the butter is really enough.
Both corn and carrots are good in this dish.

Wednesday, July 21, 2010

Vegetable Pizza- a Recipe from the 80's

I took this old recipe to a bridal shower over a week ago and forgot to post it. I almost forgot to even take pictures of it, so this is what was left over from the shower. This Vegetable Pizza is not a traditional pizza, but an appetizer made with refrigerated crescent rolls which are baked into a crust and spread with a cream cheese and ranch mixture, and then topped with chopped veggies and shredded cheese. I received this recipe from a friend back in the 80's. I thought that the ladies at the shower would have eaten this before, but no one had ever heard of it. So maybe this will be new to some of you. Several asked for the recipe. Here's how you make it.
You need 2 packages of Pillsbury Crescent Rolls. Unroll them and press into a pan, making sure to press perforations together to seal. Bake until golden. Cool and spread with the the cream cheese mixture. Top with veggies and cheese. I forgot the cheese in this picture and had to add it later. This yummy appetizer is great for any occasion. I was glad I made this as everyone loved it. Just don't serve it in a terrible looking pan like this! Cut into squares and serve it on a pretty platter or tray. If you enjoy ranch dressing and veggies, you should love this Vegetable Pizza. Enjoy!

VEGETABLE PIZZA- A RECIPE FROM THE 80's
Ingredients for crust and filling:
2 cans of Pillsbury Crescent Rolls
2- 8 ounce packages of cream cheese, room temperature
3/4 cup mayo or salad dressing
1/2 cup sour cream
1 package dry ranch dressing
1 cup shredded cheddar cheese, divided (I use a little more cheese than this)
Directions;
Open cans of crescent rolls and spread out on a 11x17 inch baking sheet. Push the dough to the edge of the pan, and make sure to seal all the perforations. Bake at 350 degrees until golden brown. Cool completely.
In a bowl, cream together the cream cheese, sour cream, mayo and dry ranch dressing. Add some Cheddar cheese, about 1/4cup or more, is good. Mix well and spread over the cooled crust.
Topping:
Chop and mix together-
3/4 cup chopped fresh broccoli
3/4 cup chopped fresh cauliflower
3/4 cup small diced carrots, or shredded carrots
3/4 cup diced green bell pepper
3/4 cup seeded, diced tomatoes
3 or 4 sliced green onions
Chop the vegetables and mix together. Sprinkle evenly over the filling and press the vegetables down slightly into the filling . Sprinkle with the remaining 3/4 cup cheese. Cover and keep chilled in the refrigerator until ready to serve. Cut into squares and serve on a nice tray.


Wednesday, July 7, 2010

Blueberry Buckle

I used to think that a buckle was the same thing as a cobbler, but it's really not. A cobbler has fruit in the bottom of the pan and topped with either a pie crust like topping, or more of a drop biscuit topping. And the fruit bubbles and thickens, but it stays separate from the topping. However, a buckle is more cake like. The fruit, blueberries in this case, are mixed into the batter, topped with a struessel topping and baked. It's like a coffee cake, dense and moist with berries. It may get it's name because the top of the cake "buckles" as it cools. And it's very delicious! I did change the spices in this recipe because I love cinnamon best in the topping. I've made this wonderful Blueberry Buckle several times and my husband and I can't get enough of it! The cake is tender but dense, and packed with blueberries, for an incredible addition to your morning coffee, or a sweet indulgence any time of day. Enjoy!
BLUEBERRY BUCKLE
Adapted from Alton Brown
Ingredients:
For the cake-
2 cups of cake flour
1 teaspoon baking powder
1/2 teaspoon salt
1/4 teaspoon nutmeg
4 tablespoons (2 ounces) of unsalted butter, room temperature
3/4 cup sugar
1 large egg
1/2 cup milk- I've used whole and 2%, both with good results
3 cups of fresh blueberries
For the topping-
1/2 cup sugar
1/3 cup cake flour
1/2 teaspoon cinnamon
4 tablespoons butter, chilled- 2 ounces
Directions-
Preheat the oven to 375 degrees. Spray a 9x9 inch glass baking dish with cooking spray.
In a medium bowl whisk together the flour, salt, baking powder and ground nutmeg. Set aside.
In a large bowl, beat the softened butter and the sugar together until creamy and fluffy. Add the egg and beat well. Add 1/3 of the flour mixture and 1/3 of the milk, and beat until incorporated. Repeat until the ingredients are combined. Gently stir in the blueberries and pour cake mixture into the prepared pan.
For the topping:
In a small bowl combine the sugar, flour and cinnamon. Add the cold butter in chunks, and mix with a fork or pastry blender until there is a crumb-like mixture. Sprinkle the sugar mixture over the cake. Bake on the middle rack of the oven for about 35 minutes, or until golden. I tested with a tooth pick and my cake took about 45 minutes. Cool 10 minutes before serving. It's delicious warm or cold. Give it a try!


Thursday, July 1, 2010

Gone to Heaven Chocolate Pie

This pie is rich, really rich, and so creamy and decadent, that it is not for the faint of heart. It's not for those who don't like intense chocolate. It's not a pie to serve after a heavy or rich meal. But, it is for those among us who crave a bit of rich, creamy chocolate at times. It's luscious with a cup of coffee or a glass of iced tea. I made this chocolate pie last week for a church pot luck and it was gone in a flash. So quickly was it gone that we had nary a sliver. So I made it again this week so we could try it. If you're needing a serious chocolate fix, give this pie a try!

GONE TO HEAVEN CHOCOLATE PIE
slightly adapted from Hershey's Kitchens

1 9 inch pie shell

2/3 cup sugar

1/4 cup cornstarch- original recipe calls for 1/3 cup

1/2 teaspoon salt

4 egg yolks

3 cups whole milk, divided

1 tablespoon unsalted butter, softened - recipe calls for 2 T.

1 tablespoon vanilla- yep, you read that right!

2 cups (12 ounce pkg.) Hershey's Special Dark Chocolate Chips

whipped cream
DIRECTIONS:
1. Bake the pie shell; either your own recipe or the refrigerated pie crust from your grocer. Cool.
In a large, heavy bottomed sauce pan, mix 2 3/4 cups of the milk with the sugar.
2. In a small bowl, combine the 1/4 cup of milk with the cornstarch. Whisk in the egg yolks until thoroughly combined.
3. Heat the sugar and milk mixture over medium heat, stirring constantly, until the milk is scalded, but not boiling. To temper the egg yolk mixture, take about 1/4 cup of hot milk and quickly whisk into the yolks. Then add some more hot milk, a little at a time, whisking quickly with each addition., until the yolks are very warm. Now, slowly pour the yolks mixture into the milk, and again keep whisking so that the egg doesn't get clumpy. Bring the pudding to a boil, stirring constantly. Let cook about 2 minutes.
4. Remove pudding from heat and stir in the butter, the vanilla and 1 3/4 cup chocolate chips until incorporated. Pour the pudding into the cooled pie shell. Place plastic wrap over the pudding to seal. This will ensure that the pudding does not form a skin. Cool. Refrigerate for several hours, or until cold and firm. Remove the plastic wrap and top with whipped cream and remaining 1/4 cup chocolate chips. I used some mini chocolate chips for topping instead. Enjoy!
Keep refrigerated. Supposed to serve 8, but it's so rich that I cut into 10 servings.

NOTE: By tempering the yolks this way, the pudding was smooth and creamy with no lumps.