Sunday, May 31, 2009

Quick Pasta Salad

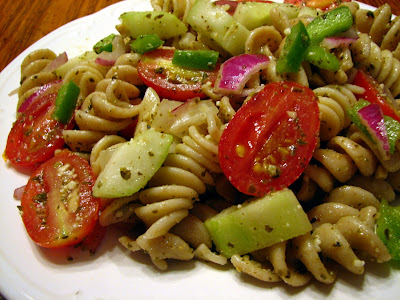
I love making pasta salads in the warm weather months. It's quick to throw together, and you just add what ever ingredients you have on hand, or you can really dress it up for company. I love the versatility of this dish. For many years, I used a really zesty Italian dressing for the salad. Then, I found a Pesto dressing that we really enjoyed, but now I can't get it in my town at our stores! Does that happen to you- you find a product that you love, and then the store stops stocking it? Maybe it's just the fact that we live in a smaller town. Anyway, today's Pasta Salad was an experiment, and it turned out pretty good, thanks to a jar of purchased Pesto.
Quick Pasta Salad
8 ounces of Rotini pasta, or pasta of choice ( tricolor is great- I used whole wheat, this time)
1 small cucumber, peeled and diced
1/2 of a red onion, diced
1/2 green bell pepper, diced
grape tomatoes, cur in half (as many as you want!)
sliced black olives, optional (thought I had some- but didn't)
1 tbs. or more of grated Parmesan cheese
3 tbs. Pesto - purchased or homemade
3 tbs. red wine vinegar
Cook pasta according to package directions. Drain. Into a large bowl, add the cucumber, red onion, bell pepper, tomatoes and any other veggies you're using . Mix pesto and vinegar, and salt and pepper to taste, and pour over veggies and stir in pasta. Add in the Parmesan cheese, stir and cover bowl and refrigerate until ready to serve. This is my "in a hurry" Pasta Salad. You can add whatever veggies that you prefer, or even pepperoni. This turned out very tasty, although, I think that a homemade pesto would be more flavorful. But, my basil plants are too small to use right now, but later in the summer, I hope to make my own pesto! What do like in your Pasta Salad?
Friday, May 29, 2009

Hamburger Pie

Do you have picky eaters in your family? When my 3 children were young, my 2 boys were quite picky, but my daughter would eat most things. I thought my boys would turn into PBJ's or Mac and Cheese before they ever grew up! Well, Hamburger Pie is a dish that all 3 of my kids would eat, so it was a standard dish in our family during those growing up years. I made it the other night because I had everything on hand and I hope that some of your kids will enjoy it too!
First, you peel 3 or 4 potatoes, cut them up and put into water to boil. Mash them when done. Then, brown some ground beef and onion in a skillet, drain it, and add some tomato sauce, water and some green beans. Let it simmer a few minutes and pour into a 8x8 casserole dish. Mound mashed potatoes on top; top potatoes with cheese and bake for about 20 minutes until the cheese is melted and casserole is bubbly. This was one of my oldest son's favorite meals!

HAMBURGER PIE
3-4 medium potatoes, peeled and cut up
1 egg, beaten
milk, for the mashed potatoes
1 ground chuck or other lean ground beef
1 can green beans, or about 2 cups of cooked fresh or frozen green beans
1 1/4 cups tomato sauce, or you can use 1 can of tomato soup, if desired
1/4 cup water
salt and pepper to taste
1/2 cup shredded American or Cheddar cheese, for topping
In a pot of boiling water add cut up potatoes and a pinch of salt and boil until tender.
Drain potatoes and mash while hot; blend in egg . Add enough milk to make the potatoes fluffy, but still able to hold their shape. Sometimes, I skip using the egg as it's only purpose that I can see is to help the potatoes hold their shape. In a skillet, brown the ground chuck and the onion together and drain off any grease that accumulates. Add tomato sauce, or tomato soup, water, green beans and salt and pepper, if using. If using tomato sauce, I add 2 teaspoons of sugar at this time (optional). Pour mixture into a 8x8 inch casserole dish and mound the mashed potatoes on top. Top the potatoes with the grated cheese and bake, uncovered, in a preheated 350 degree oven til heated through, about 20 minutes. Serves 4-6. Hope your kids enjoy!

It isn't an elegant meal, but back in the growing up years, I was just happy to find a dish that everyone liked! I haven't ever been picky; guess I love to eat too much! How about you? Are you a picky eater?


Wednesday, May 27, 2009

Blueberry Scones with Orange Glaze- Slightly Adapted from Tyler Florence

My daughter has been wanting me to make blueberry scones for awhile, so I found a great sounding recipe from Tyler Florence at Food Network. The reviews were basically good; some thought the dough too crumbly. Some thought it too wet. Some thought it was perfect, so I chose to believe them! These scones are very light, with a tender crumb, and they melt in your mouth! The butter and cream ensure a wonderful flavor along with the blueberries. The glaze is supposed to be lemon, but my daughter doesn't care for lemon and blueberry, so thus the change to orange! The flavor of the orange with the blueberry was amazing! On some of the scones, I had sprinkled coarse sugar before baking, so they had a bit of a crunch, which we like. On the other half, I used the glaze, which has a wonderful flavor! I had made only half of the glaze and it was waaay too much! I drizzled on the glaze after the scones had cooled for a few minutes. The glaze is wet, which left the scones wet, in my opinion. If you can eat all of the scones in one sitting, it's no problem, but if you're going to have to save some for the next day, I'd advise serving the glaze in a small pitcher for individual use. This glaze is runny and even in the fridge it didn't thicken much. You can see the glazed scones in the picture below. The next morning they were softer than I like, but we ate them anyway. I'm not one to waste food, unless it's just gross, that is! My daughter much preferred the scones with the dusting of the coarse sugar. After saying all that, I will definitely make these again! They have great texture and flavor and I'll serve the glaze on the side.


BLUEBERRY SCONES with ORANGE GLAZE
Scone ingredients:
2 cups flour
1 Tbs. baking powder
1/2 tsp. salt
2 Tbs. sugar
5 Tbs. unsalted cold butter, cut into chunks
1 cup heavy cream
1cup fresh blueberries
GLAZE ingredients: (I only made half of this and it was more than enough)
1/2 cup fresh orange juice
2 cups powdered sugar
zest of orange, I didn't use the zest
1 Tbs. butter
Preheat oven to 400 degrees. In a bowl, sift together the flour, salt, baking powder and sugar. With a pastry blender, cut in the butter until the mixture looks like coarse crumbs. Make a well in center of flour and add the cream. Fold everything together gently and add the blueberries and fold in. Do not overwork the dough. I found it hard to fold in the berries, so I used my hands to fold them in gently and just pushed the dough into a ball. On a floured surface, place the ball of dough and press into a circle that is about 1 inch thick and about 6-8 inches in diameter. Cut into 8 wedges and place on an ungreased cookie sheet. Brush tops with a little cream. Bake at 400 degrees for 15-20 minutes until golden. If using the glaze, let scones cool a bit before applying glaze.
To make the glaze, you can make it in a double boiler, or a microwave for 30 seconds on high. Mix juice and sugar together; add zest and butter and stir until smooth. Let it set a minute before serving. Enjoy!


In the above pic, the scones with the coarse sugar are on the left, the glazed on the right. Both tasted delicious and I've added this recipe to my list of keepers! It's hard to eat just one!
Have a great day, my friends.


Tuesday, May 26, 2009

Grilled Spice Rubbed Pork Chops

I love pork chops; you can do quite a lot with them. I wanted to grill yesterday, but I got started sort of late, so I just applied a spice rub to the chops and added some veggies to the grill so that I wouldn't heat up the house. I love meals without too many dishes, don't you? Rather than look up a recipe in a cook book for the rub, I decided to "wing it", which can be a bad thing sometimes
and result in some disappointing disasters! Thankfully, this time was a success as the chops were very flavorful and spicy, but not too spicy! And as you can see, I bought corn, not local corn as it is way too early, but I'm just so impatient for the fresh stuff that I couldn't wait! It will satisfy me for now, but I am really looking forward to some home grown corn!

GRILLED SPICE RUBBED PORK CHOPS
1 Tbs. black pepper
1 tsp. garlic powder
1 tsp. cumin
1 1/2 tsp. kosher salt
2 tsp. paprika
1/2 tsp. sugar
I used 6, 1 inch thick, boneless, pork loin chops ( bone in chops may be juicier)
Mix spices together and sprinkle on both sides of chops. Lay chops on a wax paper lined baking sheet and let set for 20 minutes or so, or you may do this step early in the day so that the pork can marinate, in the fridge, of course. I use a charcoal grill, so when the coals were covered in a light ash and, I placed the chops on the grill over the coals to sear the sides. These chops were grilled about 10 minutes each side, moving only if there was a flare up. The grilling time will depend on the thickness of the meat and the temperature of the grill, so cooking times will vary.
These chops can also be done indoors in a heavy skillet or grill pan and they turn out great! These are moist and very flavorful and I'll make these often. Enjoy!


Monday, May 25, 2009

Strawberry Rhubarb Cobbler

First off, I need to explain my unplanned absence the last few days. My mother-in-law was rushed to the hospital several days ago, so that's where I have been. Thankfully, she was able to leave the hospital yesterday afternoon and go back to the assisted living facility where she now lives. Whew, that always scares us, as she is 89, but I guess she is tough! I am blessed to have a wonderful MIL and I have enjoyed our relationship so much!
I hope you all are having an enjoyable Memorial Day weekend! We are getting ready to visit some family graves, hopefully before the rain gets heavy! Both my Father and my FIL were World War 2 vets, so we take not only flowers, but flags to their grave sites.
Yesterday after noon, I finally got to do a little cooking; I've been wanting to make a strawberry and rhubarb pie for quite awhile, but with all the busyness, I decided a cobbler would be so much quicker. Besides that, my husband is a proclaimed rhubarb hater, so I didn't want to go to a lot of trouble, if he really doesn't like it! I told him he had to try it, to be a good example to his picky son! Well, he did have some last night with a couple of huge scoops of vanilla ice cream and he stated that it was OK. That's better than hating it! Besides, I loved this so much, that I wouldn't mind at all if I had to eat the whole thing! Hehe, all to myself! That would be fine by me! But I'm sure he'll have some more, as long as there's ice cream to have with it.

I had forgotten that rhubarb is considered a vegetable, but it is very tart so it really needs the addition of sugar to make it tasty. And paring it with strawberries is a delicious match. The leaves of the rhubarb plant are considered poisonous, so be sure to remove them before cooking! I didn't have a recipe for Strawberry Rhubarb Cobbler, but I thought I remembered seeing one at Elsie's site, Simply Recipes, so I used hers, with wonderful results! I did adapt the recipe some, as I didn't have the amout of rhubarb the recipe called for, so I used more strawberries.
STRAWBERRY RHUBARB COBBLER
For the fruit mixture you need;
3 cups rhubarb pieces, cut into 1/2 inch pieces
3 cups strawberries, stemmed and sliced or quartered
1/2 cup sugar, (I could have used a little more, 3/4 cup total)
2 T quick cooking tapioca
1 tsp. grated orange peel, (I didn't use this)

Cobbler crust;
1 cup flour
2T. sugar
1 1/2 tsp. baking powder
1/4 tsp. salt
1/4 cup butter
1/4 cup milk
1 egg, lightly beaten
Preheat oven to 350 degrees
In a bowl, mix the rhubarb, strawberries, sugar and orange zest, if using and let set, or macerate for about 30 minutes.
In a another bowl, combine the flour, baking powder, and salt. Cut in the butter with a pastry blender until it resembles coarse crumbs. Stir in the milk and egg together until just blended.
Pour fruit into a 8x8x2 inch baking dish. Drop the batter on top of fruit and bake in a 350 degree oven for about 35 minutes, until golden. Serves about 6. Top with ice cream or whipped cream, if desired! Delicious! If you like your fruit really sweet, you may need to increase the sugar.
Do you like rhubarb?


Thursday, May 21, 2009

Low Fat Chicken Marinara

One time, when I was wanting a quick, week night meal that was also healthy, I came up with this dish, which is easy to make and can be on the table in 30 minutes! I guess it's a slimmed down version of Chicken Parmesan, as the chicken is baked, rather than breaded and browned in oil. Sometimes, instead of baking the chicken, I'll cut it up in 1 inch pieces, brown it in a little olive oil, and then pour in the sauce ingredients. It's good either way. I use boneless, skinless chicken breasts for this, but you could use boneless thighs if desired. The sauce only takes about 10 minutes to cook, so if you have starving kids begging for food, it will be ready soon, plus, it's hearty enough for adult appetites too! This makes enough for about 4 servings.LOW FAT CHICKEN MARINARA

3-4 boneless, skinless chicken breasts or boneless thighs(I used 3 large breasts to serve 4)

1 large can crushed tomatoes, 28 ounces( you can use diced tomatoes, if you prefer)

1 cup diced onion

1&1/2 tsp. dried oregano, or about 1 1/2 Tbs. fresh chopped oregano

1 tsp. dried basil, or 1 Tbs. fresh basil

2-3 cloves of garlic, minced or pressed

1/8 tsp. cayenne pepper, optional

2 tsp. sugar, if desired

salt and pepper to taste

8 ounces of spaghetti, or other pasta of choice

Parmesan cheese, for topping

Brush chicken with olive oil and season with salt and pepper. Place on baking sheet in a 4oo degree oven and bake for about 20 minutes until juices run clear. When done, let chicken rest on pan and tent with foil to keep it warm. As soon as chicken is in the oven, heat a large pot of water for the pasta. When water comes to a boil, add about 1 tsp. salt and 8 ounces pasta and cook until done. Drain. In a large sauce pan in 1 Tbs. olive oil cook onions and garlic till tender, about 5 minutes. Pour in the crushed tomatoes, oregano, basil, cayenne, sugar and 1/2 tsp. sea salt and black pepper, if desired. Simmer for about 10 minutes. To serve, I place a portion of pasta on the plates, top with a spoon full of sauce; top that with some thinly sliced chicken and more sauce, if you want. Sprinkle on some cheese and dinner is served! A fast, healthy week night meal that will leave you time to do other important things in the evening. What's one of your favorite quick meals that you serve on busy night?

Tuesday, May 19, 2009

My Mother's Oatmeal Cake

When I reminisce about growing up, one of my favorite things to ponder is my Mother's cooking, and the aromas that filled our home when she was in the kitchen! There are some dishes that if I close my eyes for a moment, I think I can really catch a whiff of what she made so many years ago! This cake is one of my fondest baking memories, because the aroma of Cinnamon permeates the house, and I can't even begin to tell you how the frosting smells as it goes under the broiler for a minute! The fragrance of pecans and coconut in the oven is just out of this world! This was my favorite cake growing up, and I'll admit, it remains one of my top favorites today!
The cake is so moist and tends to get moister the longer you have it. The frosting is so addictive that I'd love to just take a spoon and eat it as is, but then that would mean none for the cake! I'm sure that many of you have had this yummy, cinnamony cake as I've seen it on other food blogs before. It's just so good that it will never "go out of style"! So, let's make it!

OATMEAL CAKE
1 1/2 cup boiling water
1 cup Minute Oats
1/2 cup shortening ( or I have used butter)
1 cup brown sugar
1 cup granulated sugar
2 eggs, slightly beaten
1 cup flour
1 tsp. baking soda
1 tsp. cinnamon
1/2 tsp. salt
1 tsp. vanilla
In a bowl, pour boiling water over oatmeal and let stand 20 minutes. In another bowl, cream together shortening(or butter), brown sugar and white sugar; add eggs and oatmeal mixture and mix well. Then add the flour, baking soda, cinnamon and salt and mix thoroughly. Pour into a greased and floured 9x13 inch pan and bake in a 350 degree oven for 20-30 minutes, until done.
While cake is baking, stir together frosting;
BOILED ICING; Mix 1/3 cup butter, 1 cup brown sugar and1/2 milk in a saucepan and bring to a boil. Add in 1 cup shredded coconut and 1/2 cup chopped pecans and boil till thick, about 1 minute. Spread on cake while hot and place back in oven under broiler for a minute or two. Don't leave it long or the frosting will cook too long and be hard when the cake cools down. You're just wanting the tips of the coconut and nuts to toast, but they will burn if left too long. Try not to tear into the cake too soon, but if you do, who could blame you! It's just that good!


I am submitting this cake recipe to HoneyB, at The Life and Loves of Grumpy's Honeybunch, for this month's Family Recipes; Memories of Family, Food and Fun! Be sure to stop by her blog and check out all the yummy recipes! What was your favorite dessert while growing up?


Sunday, May 17, 2009

Grilled Ginger Peach Glazed Chicken

I had it in my head to grill yesterday and nothing was going to stop me! I had a recipe I've been wanting to try, but so many days we all were just not home at the same time, and our weather has been so stormy with it raining most days lately! Yesterday we saw the sun, so I pulled out this recipe from Better Homes and Gardens, July 2007 issue. This recipe, from Fred Thompson, a South Carolina cook book author, was so delicious and different from the usual BBQ sauces that we like. We like the spicy, sweet and tangy tomato based sauces, but I decided to spring a new one on my brood. The new sauce is supposed to have prepared horseradish in it, but my husband doesn't like it, so I subbed something a little milder, plus I used a different vinegar than called for, but this was an amazing sauce. It's a keeper that I'll be making again! We have a charcoal grill and for this recipe it has to be set up for indirect heat. In other words, the chicken is cooked over a grill pan, with the coals placed on either side of the pan. That way, the chicken doesn't burn and it slow cooks until done. It was so tender and juicy! I used thighs and legs and I removed the skin on about half the pieces to see how it would do. I don't really like eating grilled chicken skin, so if I remove it after it's cooked, I lose the sauce. And I didn't want to lose this yummy sauce! It's sweet and spicy, but with a wonderful peach flavor! Try it!
Grilled Ginger Peach Glazed Chicken
2-3 pounds chicken pieces( thighs and legs or breast halves, skin removed, if desired)
salt and pepper
1/2 cup peach preserves, large pieces cut up
1 Tbs. white wine vinegar, (I used rice vinegar)
1 Tbs. prepared horseradish, (I subbed Inglehoffer deli mustard with grated horseradish, Yum!)
1 tsp. freshly grated gingerroot
Sprinkle chicken lightly with salt and pepper. For a charcoal grill,arrange preheated coals around a drip pan. Place chicken pieces on grill over drip pan and cover grill. Grill over medium heat for 35-40 minutes. While chicken is cooking, place peach preserves in a small sauce pan along with vinegar, horseradish, gingerrroot, 1/4 tsps. salt and 1/2tsp. pepper. Heat just until preserves have melted. Brush peach mixture on chicken and grill covered another 10-20 minutes, until chicken is done, about 180 degrees in dark meat. Brush several times with peach mixture during last minutes of grilling. Use all the sauce; it's too good to waste! Enjoy! I served this with baked beans, ( a staple my son insists we must have), and coleslaw. It was a perfect, late evening meal for four.

Thursday, May 14, 2009

Classic Green Bean Almondine

This recipe has been around along time. The first time I made it, I was in my high school Home Economics class and we were preparing a dinner for our mothers. That was along time ago, waaaay back in about 1970! Gasp, I'm getting old! I think the recipe is even older than me! But it is such a delicious dish that I still make it. It's one of those that have stood the test of time and it should not be forgotten! It's very easy to make and only takes 1 pan! In a skillet, you add butter

and some sliced almonds and cook them until slightly golden. Add some lemon juice and salt and pour them in a small bowl. Wipe out pan and add a little water and salt and bring to a boil. Add fresh green beans, bring to a simmer and put on lid. Steam beans til tender-crisp.


Drain beans and add almond mixture; place in serving dish. Quick, easy, fresh and delicious! It doesn't get any better than this! Let's start:

CLASSIC GREEN BEAN ALMONDINE
makes about 4 servings

1 pound fresh green beans with the stems snapped off, and washed

1-2 tablespoons butter( I have cut the amout of butter down from original recipe)

1/4 cup sliced almonds

2-3 teaspoons fresh lemon juice

1/4 teaspoon salt, if desired

I used my 10 inch skillet with a lid for this. In skillet melt butter over low heat and add almonds, stirring occasionally until they are golden. Add 1/4 tsp. salt and fresh lemon juice and pour into a bowl for now. Wipe out skillet with paper towels. In same skillet, add enough water to come to about 1/2 inch deep. Bring water to a boil and add 1/2 tsp. salt and all of green beans. Bring back to a boil and cover pan with lid. You may use a steamer pan for the green beans, if desired. Cook green beans to tender crisp stage, about 2- 5 minutes. To test , poke beans with a fork to test doneness. I like them still a little crisp. Drain water from beans, stir in the almond and butter mixture, coating beans well, and place in a serving dish and serve. Your family will love you and thank you for making them a special dish! If they only knew how easy it was!


It's a beautiful and tasty dish that's nutritious to boot! And you can use a steamer for the beans, if desired, and then do the almonds in a separate pan, while the beans are steaming. I served this with the Honey-Mustard Glazed Salmon from yesterdays post, and some brown rice and rolls.
It was a great meal that I'll do again and again, as everyone loves this! What's your favorite way to serve green beans?


Wednesday, May 13, 2009

Honey-Mustard Glazed Salmon

I love to fix salmon, but I really don't do it often enough and it is so easy! I can remember when I was intimidated cooking fish of any kind, but after preparing it, it seemed so easy. And it is! Now, I have several "favorite" ways to do salmon, so this is just one way. And it is delicious with the honey mustard glaze. This can be done under the broiler, in the oven or on the grill. It only takes minutes and your dinner is ready! First, let me tell you that I can only buy wild salmon frozen in the 1 pound bags, so this is not fresh caught. But it's still extremely good! I thaw out the fish in the bag in the fridge. Then, it needs to be dried off with paper towels.
I place salmon in a dish and pour about half of the honey mustard glaze over it. Then, preheat the broiler and place rack under it. With this glaze you have to watch that it doesn't burn, so I have had to move the salmon onto a lower rack to prevent it from becoming a burnt sacrifice! If that makes you nervous, you can bake the salmon instead in a 400 degree oven. Let's begin.
HONEY MUSTARD SALMON
1/4 cup dijon mustard
1/4 cup honey
1 large clove garlic, minced or pressed
1 tablespoon melted butter or olive oil
4 salmon fillets, mine were 4 ounces each,or 1 pound
salt and pepper
Mix the first four ingredients together. Lay salmon in a pan, add a little salt and pepper, and pour half of glaze over it. Preheat broiler or oven. when ready to cook, place salmon on low rimmed baking sheet and place under broiler. Watch closely so it doesn't burn. Brush salmon with honey- mustard glaze several times while cooking. It will be done in about 6-10 minutes, depending in thickness and size of salmon. To test for doneness, insert a fork into the thickest part of the fish and turn slightly. If it flakes easily, it is done. Remember, if the fish gets too brown, or the pan begins to burn, remove fish to a lower rack in your oven. When done , remove salmon from oven and serve! It's a quick and easy main course, fit for company or your family. I served it with fresh green beans and brown rice.

The glaze is so good that you must be sure to get plenty on the fish! I also add more pepper if too much gets brushed off when applying more glaze. This is a wonderful tasting salmon that I will continue to make over and over again! Do you have a favorite way to prepare salmon?


Monday, May 11, 2009

Italian Chicken Sandwiches

I hope all of you had a wonderful Mother's Day! Mine was great and I had thought I would post on Saturday, but this was a busy weekend. On Sunday, we went out to eat after church to my favorite Mexican food restaurant here in town. Our oldest son and his wife were there, along with our second son and his girlfriend(and her young son), and our daughter and her boyfriend. Afterwards, we drove about 30 miles to nearby town where my MIL lives in an assisted living facility. She is a wonderful MIL and she was so excited to have all of us come to visit! We really filled up her room! It was a great day! The only cooking I did was to make Blueberry Buttermilk Pancakes and I made a fresh pot of coffee to go with them. It was a cool day, so these really hit the spot in the evening! But on Saturday, I made these delicious, Italian Chicken Sandwiches which are filling enough to be served as a quick meal on busy week nights. I purchased this Ciabatta loaf at Walmart. That is pretty much our bakery choice here, but this bread is really good. It's a sturdy, chewy loaf that small kids may not be able to handle though. Any way, I cut the loaf in half, then in half lengthwise. After toasting in the broiler, I spread a mayo mix over the toasted
bread, then topped the bread with some sliced, cooked chicken. After that, I topped the chicken with Provolone Cheese and stuck it under the broiler for a short bit, so the cheese would get

nice and melted. When removed from the broiler, I topped the sandwich with fresh basil,, red onion, tomato and topped it with the other half of bread. It is so yummy, just like ordering one from a nice deli.


You may also use lettuce or roasted red peppers if desired, or any other toppings you desire. Served with chips, salad or Sweet Potato Oven Fries, it makes a great meal!


Wouldn't you like a bite of this? It's quick to make, so lets get started.
ITALIAN CHICKEN SANDWICHES ( adapted from Cooking Light)
1 Ciabatta loaf or Ciabatta rolls, or Italian bread of choice
2 boneless, skinless chicken breast halves, cooked in a skillet
salt, pepper and garlic powder
8-10 large basil leaves
6 slices Provolone Cheese, or 1 cup of shredded Mozzarella Cheese
tomato slices
bell pepper slices, or roasted red peppers
thinly sliced red onion, if desired
lettuce, if desired
Dressing
For dressing, you can use Creamy Italian dressing, OR mix together 1/4 cup regular Italian dressing with 3 Tbs. mayo, OR mix together 1/4 cup sun dried tomato pesto with 3 Tbs. mayo. I know those are 3 choices, but I like to experiment, that way if I'm out of an ingredient, I can use something else. In a large skillet in 1 Tbs. olive oil, brown chicken breasts that have been seasoned with salt, pepper, and garlic powder, if desired. Cook until juices run clear, lowering heat, if needed. Remove chicken to a cutting board and let rest for 5 minutes. Slice chicken breasts into thin slices. Turn on broiler. Cut bread in half and place on a baking sheet, cut sides facing up. Place pan under the broiler for a minute or so, until bread is golden. Watch it carefully! Remove bread from broiler. Spread 1/2 of dressing over the bottom half of bread, and top with all of the chicken slices. Arrange cheese over the chicken and then place bread back under the broiler just until the cheese melts. It won't take long. Remove bread from broiler and finish topping sandwich with the basil, onion slices , tomato and bell pepper slices. Spread remaining dressing on top half of bread and place on top of sandwich. Don't skimp on the dressing! Cut into four sandwiches and serve. These are so scrumptious and flavorful! These sandwiches can be ready in 30 minutes, or less, depending on whether you have crying children hanging on your ankles or, if the phone is ringing and driving you crazy! It's an easy, quick meal, perfect after along day at work or any other time, for that matter. Try one today!


Friday, May 8, 2009

Corn, Black Bean and Tomato Salsa

New photo added 5-26-2012. A few years ago a friend brought a version of this salsa to a picnic we both attended and it was an instant hit, with absolutely none left over. I've changed it a little, of course, and for one thing I added the tomatoes. When you can get in season fresh tomatoes this salsa can't be topped! It is so fresh and vibrant and popping with flavor and color! I can't wait for the tomatoes in my garden to grow so I can make lots of this tangy salsa. I do use canned black beans, drained and rinsed really well, but you could certainly cook your own if desired. Fresh corn is the best also, but canned does work and so does left over grilled corn. In fact, the grilled or roasted corn is really yummy in this dish. Top it off with fresh peppers and onions and some lime juice and you've got an instant hit at any gathering. Let's make some now.
CORN, BLACK BEAN and TOMATO SALSA
1 can black beans, rinsed and drained well, or about 2 cups of home cooked beans
1 1/2 cups fresh, frozen, grilled, or canned corn(drained)
4-5 Roma tomatoes, diced small
1 bunch green onions (scallions) sliced, or some diced red onion, or vidallia onion
1-2 jalapeno peppers, seeded and minced, or other pepper of choice
1/2 bell pepper, if desired, diced
1 clove garlic, minced or pressed
1 diced avocado, diced, optional
1 small can sliced, black olives, optional
about 1/4 cup fresh lime juice
1Tbs. canola or olive oil
salt and pepper to taste
1/2 cup diced cilantro, if desired
Dice up vegetables and combine in a large bowl. Add minced garlic, lime juice and oil and mix well. Cover and refrigerate for a couple of hours before serving. You can make this salsa as hot or mild as you like. Serve with lots of tortilla chips! I normally don't add the avocado because my husband doesn't really like it, but he's not home now, so I'll eat it before he gets here! hehe
Actually, the avocado doesn't keep well if you have any left over the next day, but you can always pick it out. This is a taste of summer on a chip, but I couldn't wait for summer to get here to make it and share it with you. Enjoy! What's your favorite summer salsa?

Tuesday, May 5, 2009

Pasta with Roasted Tomatoes

Wouldn't you love to have a delicious, quick and easy side dish that would go with a variety of meats, or even stand on its own as a main dish? This dish fits the bill, as they say. Pasta with Roasted Tomatoes is great served with fish, poultry or even steak, plus, served with a salad it makes a very filling meal on its own. This is a mouth-watering, aromatic dish that will have your taste buds thanking you every time you make it! The sauce on the pasta is so simple that your dinner will be ready in less than 30 minutes! You'll need 1 pint of grape tomatoes to start. Put them in a bowl with olive oil, minced garlic, salt and pepper, and then pour out onto a foil lined baking sheet.

Aren't they gorgeous? They are such sweet little gems and they're going to get even sweeter with the roasting. Place pan in a 400 degree oven for about 15 minutes, or until these sweet gems pop and the juice starts to run. Don't they look amazingly delicious? The aroma is wonderful! Take them out of oven when they look like the picture below.

Pour tomatoes back in bowl with all of the pan juices and oil. Get every bit now! Gently smash tomatoes with a fork to release the juices, add your choice of herbs and then mix with your hot, cooked pasta and gently stir together. Oh my goodness, these tiny little tomatoes are so sweet and addicting! And they're enhanced with the garlic and herb oil that is not only teasing your taste buds, but the aroma wafting through your kitchen will make you happy all day, or evening, whatever the case. Just look as this picture of the tempting bow tie pasta and every little fold is filled with flavor! But you can use which ever pasta you want. And whichever herbs you prefer.

Pasta with Roasted Tomatoes

In a large pot, bring enough water to a boil for pasta. Add salt to boiling water. Preheat oven to 400 degrees. You need;

8 ounces uncooked pasta, I used Bow tie, but Angel Hair or Penne is great
1 pint grape tomatoes, rinsed

2-3 tablespoons olive oil

2-3 fat garlic cloves, minced

10-12 fresh basil leaves, diced, or about 1 teaspoon dried basil ( or you can use oregano)I used 1 tsp. dried oregano and 1 Tbs. fresh, flat leaf parsley

sea salt and pepper

Parmesan cheese or feta cheese for topping

Add pasta to pot of boiling water and cook to al dente. Line baking sheet with foil. In a large bowl add tomatoes, garlic, olive oil and salt and pepper and mix. Pour onto baking sheet and place into preheated 400 degree oven for about 15 minutes until tomatoes have wrinkled and popped. Remove from oven and pour tomatoes and all juices into the bowl. Taking a fork, make sure that tomatoes have popped, so that you don't get a mouthful of hot juice. Remove pasta from stove, and drain well, but reserve about 1/2 cup of pasta cooking water in case it is needed. Add fresh or dried herbs to tomato mixture and then add pasta and stir gently making sure pasta is covered. If pasta seems a little dry, add a little of the reserved pasta water. I had to use dried oregano because it was pouring down rain when I needed to go outside and pick it! I should have planned better! But I did have some fresh flat leaf parsley inside, so it was a very flavorful dish after all. It is wonderful with steak or fish. Tonight it was served with chicken and we all loved it.

If you want a fresh, healthy, flavorful and quick dish, this is for you! Don't we all need some easy, but delicious dishes that are versatile? We've got lots to do this summer, so we can't always be in the kitchen. Hope everyone is having a great week; I love your comments and appreciate all of you stopping by. Thanks!


Monday, May 4, 2009

Oatmeal Chocolate Chip Muffins

Late last night, about 10:30 to be exact, I realized that there was nothing quick for this mornings breakfast. For me that's no problem, but for my daughter and son who leave very early for college and work, it's nice to have something to grab on the way out the door. So I make muffins or some other quick option that is easy for them to fix in a flash. I remembered seeing a muffin recipe at Judy's Kitchen that I wanted to try ( several actually), so after checking her blog, I found I had all the ingredients! Yeah! I didn't have to go to the store late at night! The recipe is for Oatmeal Chocolate Chip Muffins with Chocolate Streusel, but since it was so late, I decided to leave off the streusel topping, although I'm sure it is yummy. I'll make it next time, and definitely there will be a next time! These were wonderful muffins made with oatmeal, buttermilk, honey and chocolate chips! They were healthy and had a wonderful dense crumb and just sweet enough. The honey was perfect and not at all overpowering. And we can't forget the chocolate chips, after all chocolate is a food group, isn't it? In fact, I used more chocolate chips than called for and the muffins were not too sweet. This is now one of my favorite muffin recipes. Let's make these;

OATMEAL CHOCOLATE CHIP MUFFINS

1 1/4 cups flour

1 cup oatmeal, quick or old fashioned- uncooked

2/3 cup chocolate chips (recipe calls for 1/2 c.- I used mini semi- sweet chips)

1 tsp. baking powder

1/2 tsp.baking soda

1/2 tsp.salt, optional ( I used 1/4t.)

2/3 cup low-fat buttermilk (you can use 2 tsp. vinegar in 2/3 cup regular milk to sub for buttermilk)- or use SACO, a dried buttermilk found at your grocers

1/2 cup honey

1/4 cup vegetable oil ( I use canola)

1 egg, lightly beaten

Heat oven to 350 degrees and grease or line 12 muffin cups with paper liners. Streusel Ingredients- 1/3 cup sugar, 1/4 cup flour, 2 Tbs. cocoa 2 Tbs. melted butter. Combine ingredients in a bowl and set a side. I didn't use the streusel topping. Instead, I added a few more chocolate chips to the top of muffins and sprinkled with coarse sugar.

For muffins, mix flour, oats, baking powder, soda and salt in large bowl. In another bowl combine buttermilk, honey, oil and egg and mix well; then add wet ingredients to dry mixture and mix until just blended. Do not over mix! Divide mixture evenly to the 12 muffin cups. I sprinkled more chocolate chips on top and some sugar, but if you are using streusel, pat it gently to set it. Bake for about 20 minutes. Remove muffins from pan after about 5 minutes. Serve warm and enjoy! These would be a great addition to a Mother's Day brunch if you are planning one. Actually, they would be delicious any day of the week. They were delicious with my morning coffee! What do you like to eat for breakfast?

NOTE: If using Old Fashioned Oats, the batter will at first be somewhat thin, but don't add more oatmeal. The oatmeal will absorb the liquid and will bake up just right!
I found that if you use the Quick Oatmeal, the batter will be thick when you stir it up. It will still work just fine. The Quick Oatmeal absorbs the liquid in the batter very quickly, thus the thicker texture.
NOTE: Another option for buttermilk: You can buy dried buttermilk at the store. The brand is Saco, and it works great. Follow directions on the can for mixing, and use as you would use buttermilk for baking.

Sunday, May 3, 2009

Roasted Potatoes with Herbs

How I love the humble potato! I love it baked, fried, mashed, in casseroles and any other way you can think of! My favorite though, is roasted in the oven at high heat with salt and some fresh herbs and a little pepper. It' so easy, and fixed this way, they go with so many different meals. These tasty tubers are Petite Golds, which are about the size of golf balls, or a little larger, and have a creamy, buttery taste and texture. For preparation, scrub them with water and a brush, then dry well with paper towels. I used about 10 potatoes which was more than my husband and I could eat. Cut in 2-4 pieces, depending on how large the potatoes are. In a bowl, add the potatoes, 1-2 tablespoons of olive oil and 1 tablespoon fresh herbs and mix.
Pour mixture onto a baking sheet. Add kosher salt (or whichever salt you prefer), and pepper, if desired. I love pepper on these tators, but my hubby could do without it! I used about 1 T. fresh chopped Rosemary with these potatoes, but use whatever herbs you like. Thyme is a favorite and garlic always makes them extra, extra delicious! Dried herbs will work, but use less than the fresh as the flavor is stronger. Bake in a preheated 450 degree oven for about 30 minutes.

Check them after 25 minutes as they will cook quickly and you don't want to burn these addictive tators! I like them pretty golden brown, but oven temps can vary. Take them out of the oven and enjoy these delicious, crispy potatoes with any number of dishes. I sprinkled more Rosemary on them for an extra kick of flavor before serving. You may also use new, red skinned potatoes, or even substitute russets or other large potatoes. Just cut them in smaller, uniform pieces to ensure they are evenly cooked. This is such an easy side dish, but totally delicious! If you haven't made these yet, try them today!