Wednesday, March 30, 2011

Cheesecake Bars - an oldie but Goodie

I love cheesecake, but don't always want to take the time to make one. That's where these delicious bars come in. They have all the flavor of cheesecake, but are quick and easy to make. We love the light lemon flavor, but if lemon is not your thing, just leave it out and double the vanilla. This retro recipe was given to me by a highschool friend way back during our senior year. I'm talking 1971 baby! I've taken the liberty of doubling the amount of filling that was in the original recipe because, in this instance, more is better. I don't want to be cheated on my cheesecake fix, do you? Give these groovy bars a try today! CHEESECAKE BARS
Ingredients for crust:

1/3 cup brown sugar

1/3 cup soft butter

1 cup flour

Cream the brown sugar and butter together. Then blend in the flour until crumbly. Separate 1 cup for topping. Place the rest in a 8x8 inch ungreased baking pan and press down to make crust. Bake at 350 degrees for about 10 minutes. Remove from oven to cool.


Ingredients for filling:

2 - 8 ounce bars of cream cheese, softened

1/2 cup granulated sugar

2 eggs

4 tablespoons milk

2 tablespoons fresh lemon juice

1/2 teaspoon vanilla

In a large bowl, beat the cream cheese and sugar until creamy. Add the eggs, milk, lemon juice and vanilla and beat well. Pour the cream cheese mixture over the crust and spread out evenly. Sprinkle the reserved flour mixture (topping), over the cream cheese filling. Bake at 350 degress for about 25 minutes. Cool and refrigerate. Cut into bars and enjoy!

Friday, March 25, 2011

Amish Cinnamon Rolls with Caramel Frosting ( using left-over mashed potatoes!)

What comes to your mind when you think of cinnamon rolls? Is the sweet frosting your favorite, or maybe the filling? My favorite is the cinnamon infused bread. I Love cinnamon rolls still warm from the oven, with soft ribbons of dough infused with plenty of sweet, cinnamony filling, and topped with a luscious glaze. That describes these rolls perfectly! And that's why I don't make them very often, because I find them irresistible, even addictive. I've had this recipe bookmarked for months and they kept calling to me and I finally gave in to the craving. These Amish Cinnamon Rolls are pure bliss; you need to make them soon! These rolls contain leftover mashed potatoes, which gives the rolls a tender, pillowy, texture. My potatoes were mashed with milk, butter, and salt and pepper and they worked perfectly in this recipe. After the dough is mixed all together, I took it out of the bowl and kneaded it a few times just until it came together into a ball. Then the dough is placed in a large bowl, covered with a clean kitchen towel and left to rise until doubled. It more than doubled and was so poofy.

Punch the dough down to deflate the air out of it, and roll into a large rectangle.

Spread the cinnamon and sugar mixture evenly over the dough, except for the edges.
Starting at the end nearest you, roil up the dough tightly and pinch the seem together at the end. Work it to keep the roll as even as possible while rolling.
Cut the roll into even slices with a sharp knife. Carefully lift them and arrange in baking pans. I used four round 9 inch pans, and I wanted to share these treats with my sons and their families.
Cover the pans with a kitchen towel and let them rise until doubled, about 1 1/2 hours. Then bake in the oven. Try to be patient.
I frosted these rolls while they were still warm, but not right out of the oven. Let them cool off just a bit.
I ate one immediately; I'm weak when it comes to warm cinnamon rolls-very, very weak! These were fantastic and made my husband so happy. I hope you'll give them a try when the craving hits you.

In this recipe, I changed the margarine to butter, made more filling and gave more directions for making these delicious rolls. There just wasn't enough directions for someone who might want to make cinnamon rolls for the first time. This may look like a long recipe, but it's easy and comes together quickly. Amish Cinnamon Rolls with Caramel Frosting
adapted from a recipe at Tasty Kitchen

Ingredients:

For the rolls:

2 teaspoons plus 2/3 cup of sugar-divided

1 cup warm water

2 packages yeast, 0.25 (1/4) ounce packets

4 whole eggs, beaten

2/3 cup melted salt-free butter

1 teaspoon salt

1 cup homemade mashed potatoes-room temperature

about 6 cups bread flour- you may not use all of it

For the filling:

1 1/2 cups light brown sugar

2 tablespoons ground cinnamon 6 tablespoons softened butter

For the Caramel Frosting:

1 stick butter

1 cup light brown sugar

1/4 teaspoon salt

1/4 cup milk - I used around 2 more tablespoons to thin down the frosting some

1 teaspoon vanilla

2 1/2 cups powdered sugar

Directions:

1. For the rolls, mix the 2 teaspoons of sugar, warm water and yeast together in a bowl. Let stand 5 minutes. It will get bubbly.

2. In a large bowl, combine the beaten eggs, the remaining 2/3 cup sugar, melted butter and the mashed potatoes and combine well.

3. Stir the yeast mixture into the egg mixture. Now add 2 cups of bread flour and combine well.

4. Add more flour, 1 cup at a time, combining well after each addition. When you add the fifth cup, dough will be less sticky so add only as much flour as needed to form dough into a ball. I used about 5 1/2 cups flour, but used the rest while kneading the dough and rolling it out.

5. Lightly flour a work surface and knead the dough just until it all comes together in a smooth ball. Add extra flour if needed to keep the dough from sticking to your work area. Place dough in a large bowl and let rise until doubled. Directions say 2 hours, but mine was ready in 1 hour 30 minutes.

6. When dough has risen, punch it down in the bowl, deflating the air. Knead a few times on a lightly floured surface. Now you can roll out all the dough to about 1/4 inch thickness, but I cut the dough in half and worked with half of it at a time. In my small kitchen, that was easier for me. Try to roll the dough into a rectangular shape. I rolled each half of my dough into approximately a 20 in. by 16 inch rectangle.

7. In a small bow, mix together the filling ingredients-the brown sugar, cinnamon and melted butter.

8. Spread the softened butter gently over the rolled out dough; sprinkle the filling ingredients over the rolled out dough and lightly press into the dough.

9. Starting at the edge closest to you, begin rolling up the dough. Continue until it's all rolled and then try pinching the edge to seal it. Cut this roll into sections. I made 28 rolls; that fit 7 rolls into each of my four, 9 inch round pans. So, I cut the long roll in half, then each half in half again, and kept going until I had 28 fairly even sections of rolls. Place each roll in a greased pan (I used 4 round pans). Cover with clean towels and let rise until doubled, about 1 1/2 hours.

Preheat oven to 350 degrees. Place pans of rolls in the oven and bake until golden, 20-25 minutes.

10. While the rolls are baking make the frosting. Melt the butter in a sauce pan over low heat. Stir in the brown sugar and salt. Cook for about 2 minutes; mixture will be grainy. Add the milk and cook for about 30 seconds until no longer grainy.. Remove pan from heat and add the vanilla. Stir in the powdered sugar and let cool. (If the powdered sugar is lumpy, you may need to sift it, or use an electric mixer to beat it until smooth).

11. Remove the rolls from the oven. Let cool slightly.

12. Frost the rolls. If the frosting is too thick, add a bit of milk to thin it to the desired consistency.

Enjoy the fruit of your labor!

NOTE: These rolls could be baked in a large baking sheet also. I also think that 3 round pans could be used; it would just make larger rolls.

Monday, March 21, 2011

Tijuana Torte (a Mexican-style casserole)

While flipping through an old recipe book of mine, called "Some of the Best Recipes Ever Assembled into One Cookbook", I came across this Mexican-style casserole that I used to make often. While it wasn't a favorite of our kids, my husband has always loved it. Truthfully, it isn't my favorite Mexican casserole, but I do enjoy it as it has a layer of sour cream that really sets the Tex-Mex flavors off. I always put the canned tomatoes in the blender to pulse, because my family doesn't like chunky tomatoes in their food. Picky, I know, but I do what needs to be done to get people to eat! This easy casserole is layered like a lasagna and is mild in flavor. It calls for stewed tomatoes, which are somewhat sweet, but I sub diced tomatoes most of the time. Use whichever you prefer. I hope you enjoy this flavorful casserole.
TIJUANA TORTE
Ingredients:
1 pound ground chuck or ground round beef
1 medium onion, diced
1- 15 ounce can can diced tomatoes, or stewed tomatoes (I pulse them in the blender)
1 - 8 ounce can tomato sauce
1 -4 ounce can diced green chilies
1 package taco seasoning
flour or corn tortillas- I used 18 fajita sized flour tortillas,(6 for each layer), but any size will work
about 1 cup of sour cream
1 pound freshly grated cheddar cheese
1. Brown ground beef and onion in a skillet; drain off any fat from the meat. Add the rest of the ingredients to the meat, and simmer for 10 minutes.
2. Place 1/4-1/2 cup of mixture in the bottom of a 9x13 inch non reactive baking pan. Place a layer of tortillas over that.
3. Place about 1/3 of the meat mixture over the tortillas. Sprinkle with shredded cheese.
4. Add another layer of tortillas, and then a layer of meat sauce. Cover with more cheese; then dollop with all of the sour cream and gently spread out.
5. Lastly, cover with the rest of the tortillas, the meat sauce and the rest of the cheese.
6. Bake in a preheated 350 degree oven for 25 minutes, until cheese is bubbly.
Remove from oven and let cool about 10-15 minutes before serving. Enjoy!
NOTE: I usually make this casserole in 3 layers, but it would work well in 2 layers, if preferred.

Tuesday, March 15, 2011

Cowboy Cookies

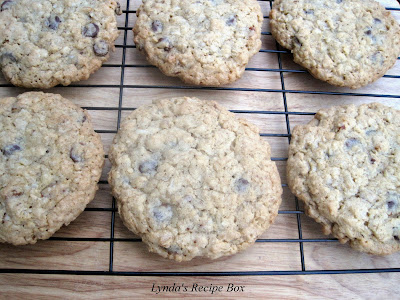
I don't know if you've had Cowboy Cookies, but they are chock full of goodies! Made with butter, flour and oats, they also contain nuts, chocolate chips and coconut for a real delicious treat. Some people make them a smaller size, like the picture above, where I measured the dough with a tablespoon. But very often I've seen them as a large cookie, where a 1/4 cup is used to measure the dough.

Either way, they are wonderful treat and I've convinced myself that they are suitable for eating with my morning coffee! After all, they have lots of oats and nuts, which are healthy, right? Watch them closely as they bake as overbaking can cause them to be dry. They should be just turning golden around the edges and the center should be losing that shiny look. They will continue to set after coming out of the oven. Then you can eat them all; or not! Here's my recipe.

COWBOY COOKIES
from an old church cookbook
2 sticks unsalted butter, softened
1 cup light brown sugar
1 cup granulated sugar
2 large eggs, beaten
1 1/2 teaspoon vanilla
1 (6 ounce package of chocolate chips)
1/2 cup coconut
2 cups all purpose flour
1/2 teaspoon baking powder
1/2 teaspoon salt
1 teaspoon soda
2 cups oatmeal
1 cup chopped nuts- I used pecans
Directions:
Preheat the oven to 350 degrees. Cream the sugars with the butter. Add eggs and beat until fluffy. Stir in the vanilla. Combine flour, salt, baking powder and soda in a bowl. Add the dry ingredients to the butter mixture. When combined, add the oatmeal, chocolate chips and coconut and stir with a large spoon until all is combined. Dough will be crumbly. If making large cooies, measure the dough in a 1/4 measuring cup. Place on a baking sheet, 6 cookies to a large baking sheet. Flatten dough with the palm of your hand, or use the bottom of a glass. Bake in a 350 degree oven for 11-15 minutes, until slightly golden around the edges and set in the middle. Remove cookies from oven; let set on cookie sheet for 1 minute and then remove to cooling rack.
If you prefer smaller cookies, use a tablespoon to measure the dough. Place cookie dough on cookie sheet, flatten slightly and bake for 8-10 minutes. Follow rest of directions above. Enjoy!


Wednesday, March 9, 2011

Tortellini Soup

There's nothing like a hot bowl of soup when you've been sick and it's cold outside to boot. I was wanting soup to eat the other night, but didn't want to spend too much time with it. I remembered this recipe that I had bookmarked, so decided to give it a try. With just a few ingredients, including purchased ravioli, it packs plenty of flavor and was plenty filling for me. It goes together very quickly, which is an added bonus. I hope you'll give it a try.

TORTELLINI SOUP
slightly adapted from The Well-Fed Newlyweds at Tasty KitchenBold
Ingredients:
1 tablespoon olive oil
2 cloves of garlic, minced
1/2 of a small onion, diced
1 large carrot, peeled and diced- my addition
1/2 teaspoon dried oregano
1/2 teaspoon dried basil-my addition
1 quart low sodium chicken broth, or stock
15 ounces small diced canned tomatoes-they used whole tomatoes
salt and pepper to taste
9 ounces tortellini, fresh or frozen- any variety (I used cheese filling)
3 cups fresh baby spinach
Parmesan cheese for topping

In a large pot heat the oil over medium heat. Add the onion and cook until softened. Then add the garlic and stir for about 30 seconds until fragrant. Add the oregano, basil, chicken broth, and tomatoes. Bring the soup to a boil and add the tortellini and cook according to the package directions. One minute before the tortellini are done, season with salt and pepper and add the spinach. Stir to combine. Dinner is now ready. Enjoy!


Monday, March 7, 2011

Baked Creamy Chicken Taquitos

These are very flavorful, mildly spicy Baked Chicken Taquitos, and my photos are definitely not doing them justice. But everyone was hungry, so I took a few quick pictures before eating and thought I'd take more after the meal was finished. I forgot to mention that fact though and there were none left. Not a one. So, I am stuck with these bad photos until the next time I make them. And I will make them again. I found this recipe at The Sisters Cafe, and knew my daughter and husband would like them. These Baked Taquitos are spicy and creamy on the inside, and crisp on the outside. If baked long enough the tortillas will crisp, without having to fry them in oil. They go with any Mexican food coombination, and are easy to put together. I brought home a rotisserie chicken from the store and used part of it for this recipe. Here's how they are made.
BAKED CREAMY CHICKEN TAQUITOS
slightly adapted from The Sisters Cafe
1/3 cup (3 ounces) cream cheese
1/4 cup green salsa (salsa verde)
1 tablespoon fresh lime juice -do not omit this!
1/2 teaspoon ground cumin
1 teaspoon chili powder
1/2 teaspoon onion powder-I omitted this
1/4 teaspoon garlic powder
3 tablespoons chopped fresh cilantro- I only used about 1 T.
2 tablespoons diced green onions
2 cups shredded, cooked chicken- I used a rotisserie chicken
1 cup grated pepper jack cheese
small corn tortillas, or fajita size flour tortillas-I used flour
kosher salt
cooking spray
Heat oven to 425. Line a baking sheet with foil and lightly coat with cooking spray.
Heat cream cheese in the microwave for 20-30 seconds so it's easy to stir. Add green salsa, lime juice,cumin, chili powder, and garlic. Stir and then add green onions and cilantro. Add chicken and cheese and mix.
You can do this step early in day and keep it in the fridge.
Work with a few tortillas at a time and warm in the microwave until they are pliable enough to roll without cracking.
Place 2-3 tablespoons of chicken filling on the lower third of a tortilla, keeping it about 1/2 inch from the edges. Roll it up as tight as you can and lay on the baking sheet. Lay all of the taquitos on baking sheet,making sure they are not touching. Spray the tops of taquitos with cooking spray and sprinkle lightly with some kosher salt.
Place pan in oven and bake for 15-20 minutes, or until crisp and brown. Watch that you don't burn the ends. Dip them in salsa, guacamole, or sour cream. Enjoy!

Tuesday, March 1, 2011

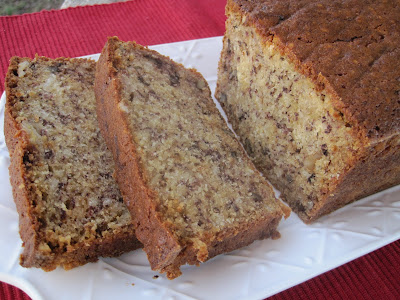
Very Moist Bannana Bread with Walnuts

I cannot resist a big slice of Banana Bread, especially if it's moist and full of crunchy nuts. This is my Mother-in-laws delicious recipe. She preferred using Black Walnuts in it when she could find them and insisted that walnuts added to the moistness of this bread. While black walnut trees are common here, I preferr the english walnut, but either will work in this recipe. All I know is that this Banana Bread is delicious and I have a hard time stopping with one slice. I have already posted my Mothers recipe, but I wanted to add this one too, since I'm going through our family's recipes. This moist, sweet quick bread makes a large loaf. My MIL baked this bread in a 8x8 inch baking pan, but I used a loaf pan this time, which took about an hour and 20 minutes. Either way, I think you will enjoy it.
By the way, thank you for the well wishes-I am feeling much better and can finally taste food again. Eating is much more enjoyable when the food tastes good; now on to the Banana Bread!
Moist Banana Bread with Walnuts

3/4 cup unsalted butter, melted
1 1/2 cups sugar
1 1/2 cups mashed bananas, about 3 large
2 eggs, beaten
1 teaspoon vanilla- I omit this
2 cups all purpose flour
1 teaspoon baking soda
1/2 teaspoon salt
1/2 cup buttermilk
3/4 cups chopped walnuts (or any nut of your choice)

Directions:
Grease and flour a large, 9 5/8 x 5 1/2 inch loaf pan, or a 8x8 inch cake pan. Preheat oven to 350 degrees (325 for dark pans).
Mix the mashed bananas, melted butter, sugar, eggs, and vanilla together in a large bowl. In another bowl, sift the flour, baking soda and salt together. Mix dry ingredients and the buttermilk into the banana mixture. Pour batter into the prepared pan and place in oven. Bake about 1 hour and 15 minutes, or until a toothpick inserted into the middle comes out clean. Let cool completely before serving. Wrap tightly in aluminum foil. Enjoy!