Friday, February 27, 2009

Guacamole Dip

I have to say that I am very grateful that we have avocados to enjoy! They have a nutty, buttery flavor that is delicious in so many dishes. Some people shy away from making homemade Guacamole, but it is quite easy to prepare. Start with ripe avocados. Push your thumb against the skin and if the fruit "gives" a little, it's ripe. If it gives too much, it may be too ripe to use. Also, it's easy to alter this dip to your own liking. I use less onion in Guacamole than I used to back in the 70's when a friend gave me this recipe. Boy,does that make me sound old! Anyway this recipe originally called for 1 medium onion and that's too much for me now, unless Vadalia onions are in season. Vadalia onions are sweeter and very easy on the digestive tract. Today, I used just 4 tablespoons of diced red onion, so I have cut down. Just make it how you like it!

Guacamole Dip
2 ripe avocados, pitted and peeled
4 Tbs. finely diced red onion
1 or 2 diced jalapenos, Serrano's, or chili peppers ( I used 1 small chili)
1 or 2 ripe Roma tomatoes, seeded and finely diced ( I used 1)
1 Tbs. fresh lime juice ( or lemon juice)
1 finely minced garlic clove, if desired
1/2 tsp. sea salt
dash of black pepper
2 Tbs. or more of chopped cilantro

To cut an avocado, cut it length wise all the way around and pull it in half. It will have a large seed inside. If the seed doesn't release from the fruit easily, cut that half of avocado length wise again and pull apart. The seed will come out now. With a spoon scoop out the pulp into a bowl and mash well with a fork. Add the diced onion, peppers and tomato. Add the rest of ingredients and mix well. It's best if chilled for the flavors to develop. Put into a serving bowl and cover with plastic wrap. Place the wrap right on the Guacamole to keep the air out. The air is what turns Guacamole brown. When ready, serve with your favorite tortilla chips. If you have much of a crowd, you may need to double the recipe! Enjoy!

Thursday, February 26, 2009

Vegetable Saute; Dinner Alone

A few days ago I went to a nearby town to do some shopping and just to enjoy the warmer weather we've had the past week. I had a wonderful afternoon of browsing and topped it off with my favorite Starbucks drink on the way home! I knew I would be home alone for dinner and that doesn't bother me, but I wanted something good and didn't want to make a mess! So, rummaging through the fridge I came up with this veggie saute, a one pan meal with stuff just hanging out in the crisper! Here's what I used this time. 1 small zucchini squash, diced
1 baby Yukon Gold potato, that had already been cooked, sliced
some chopped onion
1/2 chopped bell pepper
5-6 baby cut carrots, quartered
1 egg, scrambled
In a small skillet in about 1 tbs. olive oil I sauteed the squash, onion, bell pepper and carrots for about 5 min., then added the sliced potato and cooked until veggies were tender crisp and potato was browned. I pushed the vegetables to the side of the pan and added a bit more oil and poured in the egg. Stir it around till done and then stir it in with the veggies. I added kosher salt, pepper and a pinch of thyme. Voila! Dinner for one is served! It really was good, would have been even better with asparagus, but I didn't have any. I had some crusty bread to top it off and my tummy was happy! Are there times when you eat alone? What do you eat? Salad, sandwich, or something that no one else in your family will eat? Your comments are very appreciated!

Wednesday, February 25, 2009

Almond Streusel Coffee Cake

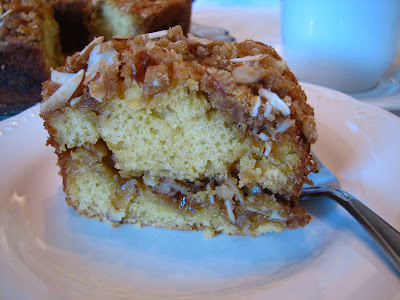
While going through my Mother's recipes, I found this one for Almond Streusel Coffee Cake, written on a sheet of paper, probably from one of her friends. It sounded really good and I decided to make it as written instead of changing it around any. Sometimes I can get in trouble changing a cake recipe before I have even tried it! I'm glad that I didn't change it because this is a wonderful coffee cake with an orange flavor that isn't overpowering and the cake is light and not too sweet. The streusel is sweet and nutty, but it balances out with the citrus flavor of the cake. It's a keeper for me! Make the streusel first so that you'll have it ready. Next you'll mix the batter in a bowl. The batter will be thick, but easy to spread. Half of the batter is spread in a tube pan and topped by half the streusel; then repeated. It'll look like the picture below. In fact it'll probably look better than my picture! Let's get started; I want another piece of cake!
STREUSEL
1 cup brown sugar, packed
1 cup sliced almonds, or nut of your choice
1/4 cup flour
3 Tbs. melted butter
1 tsp. grated orange zest
In a bowl mix together the brown sugar, nuts and flour. Stir in the butter and zest and set aside.
CAKE
1/2 cup softened butter
1/2 sugar
3 large eggs
1 tsp. orange zest
1/2 tsp. vanilla
2 cups flour
1 tsp. baking powder
1 tsp. baking soda
2/3 cup orange juice
Preheat the oven to 350 degrees. Grease a tube pan. In a large bowl, beat together butter and sugar with an electric mixer. Add eggs in 1 at a time, beating well. Beat in zest and vanilla. In another bowl mix together flour, baking powder and baking soda. With the mixer on low, beat flour mixture and orange juice alternately into egg mixture. Spoon half of cake batter into prepared tube pan; top with half of streusel mixture. Top this with rest of batter; add batter in dollops and gently smooth over the streusel. Then add the last layer of streusel. Bake at 350 for 30-35 minutes until a toothpick inserted comes out clean. Cool cake on a wire rack. To remove cake from the pan, I took a thin knife and drug it between the pan and the cake in case it had stuck anywhere. Since I used a angel food cake pan, I also ran my knife between the bottom of the pan and the cake to loosen it. The next time I make this, I may try using a spring form pan, as I was a little worried that I might crack the cake getting it onto the serving plate. But I made it! Slide the cake onto the serving plate and drizzle lightly with the glaze. I actually forgot the glaze and didn't notice it until I posted these pictures! But with, or without the glaze, this is a delicious coffee cake.
GLAZE
1/2 cup powdered sugar
2 1/2 tsp. orange juice- mix these two together and drizzle over cooled cake( try not to forget this part!)


Cake's ready to eat! Why don't you drop by for coffee and cake and help calm me down! So, tell me, have you ever forgotten an ingredient in a dish that you served to someone? Was it something that was really missed, or was it like my glaze, just a topping? I'd love to hear about your goofs!


Monday, February 23, 2009

Minestrone Soup

I make lots of soup during the cold months of the year. It's warming, comforting, easy on the budget, plus, I can send it in a thermos with my husband to work! Whats not to like! In fact, the only thing I have liked about winter the last few years is the SOUP! Sorry, I'm just looking forward to spring so much. It's warming up some this week, so I know spring is around the corner! But back to the Minestrone Soup. My daughter and I have been experimenting with making Minestrone this winter. She, because she's trying to replicate one at a favorite restaurant; me, because I end up using whats on hand. I went to the store to buy kale for the soup, but it was not fresh, so I ended up using some frozen spinach I had in the freezer that needed to be used. In fact, I was supposed to be posting about pork roast, but my pictures didn't turn out well, so, back to the Minestrone Soup! First, we'll chop our veggies;
1 large carrot, 1 large stalk of celery, 1 onion, 2 cloves of garlic, and 1/4 pound of fresh green beans. In a soup pot, over medium high heat, add 2 Tbs olive oil and add veggies to pot.

Stir and let veggies brown a little , 15 minutes or so. Then you need to add 6 cups water or broth( I used both, 3 cups water and 3 cups broth).Add salt and pepper and canned tomatoes and simmer about 20 min . Add the chopped zucchini and rest of ingredients and simmer another 10 min. This recipe is adapted from an old Good Housekeeping cookbook.


Minestrone Soup
2 Tbs. olive oil
1large carrot, diced
1 large rib celery,thinly sliced
1 medium onion, diced
2 cloves garlic, minced
1/4 pound fresh green beans, cut into 1 inch pieces
6 cups water or broth
1 1/2 tsp. salt (I used sea salt)
1/4 tsp. pepper
1 tsp. dried oregano, or 1 Tbs.of fresh oregano, chopped
1/2 tsp.dried thyme, optional
1 zucchini, diced
1 can diced tomatoes, 15 oz.
about 5 oz. chopped frozen or fresh spinach ( or use kale)
1 can of cannellini beans (white kidney beans), or 1 can of red kidney beans
1/2 cup macaroni or other pasta of choice
1 cooked chicken breast, cubed (optional)
grated Parmesan cheese, for topping
In a soup pot over medium high heat, cook carrot, celery , onion, green beans and garlic in olive oil until soft and lightly browned, about 15 min. Add water or broth, salt and pepper,oregano and canned tomatoes. Bring to a boil, then reduce heat and simmer covered,for about 20 min. Stir in spinach, macaroni, beans and chicken, if using, and cook for another 10 minutes until pasta is done.


Ladle into bowls and top with Parmesan cheese, if desired. This is such a flavorful soup, especially if you can use fresh oregano, but dried works well too. And it is great without chicken, but my husband the carnivore, likes meat in his soup! So, make a pot of soup to enjoy while we wait out the end of winter and look forward to all those spring recipes!


Thursday, February 19, 2009

Blueberry Buttermilk Pancakes

I have been cleaning out the fridge and freezer the last day or two and discovering items I forgot I had. Some were good, like blueberries, some, were not so good. After contemplating what to do with my treasure of berries, I decided to make Blueberry Buttermilk Pancakes. I love them! They are so light and delicious with a burst of blueberry flavor. If you haven't made homemade pancakes before, you should try these, as they are so much better than using a mix. Plus they are very easy! When my kids were younger, my 2 boys were very picky and wanted plain pancakes, but my more adventurous daughter liked blueberry. So, I began adding blueberries to the batter after I had poured it on the griddle so I could make half blueberry and half plain pancakes! Just pour the batter on the grill, ( and yes, the batter should be lumpy), and then

immediately add however many blueberries you want to the cakes. Push the berries down into the batter a little. You can even cover the berries with some batter if you want.


When the edge of the cakes looks dry and there are bubbles on top, just flip them over and cook until done. You may hear a little sizzling from the berries, but that's just normal. You may keep them warm in a 175 degree oven while you finish cooking the rest.


Blueberry Buttermilk Pancakes

2 cups flour

2 1/2 tsp. baking powder

1/2 tsp. baking soda

3 Tbs. sugar

1/2 tsp. salt

2 large eggs, beaten

3 Tbs. oil or melted butter

2 1/2 cups of buttermilk

1- 1 1/2 cups of fresh or frozen blueberries

1 tsp. vanilla, optional ( I sometimes forget this and they're still good)

In a large bowl, mix the dry ingredients. In a smaller bowl add all the wet ingredients and mix together. Add the wet to the dry ingredients and mix well with a whisk or wooden spoon, but batter should be lumpy! Don't over mix or pancakes will not be light and fluffy! Add in blueberries, if using, and mix gently with wooden spoon. Batter will be thick. I use a 1/3 measuring cup to scoop up the batter and pour onto a hot griddle, (about 350-375 degrees if using an electric one). You may have to take a spoon and flatten the batter down a bit, and then let cook until edges are lightly browned and dry looking and there may be a few bubbles appearing on top. Carefully flip the pancake over and cook until done. If the batter gets way too thick, I just add a little regular milk and stir carefully. You may keep pancakes in a warm oven until you're done with all of them, but if your family is like mine, they like them hot off the grill and are standing in line for the freshest ones! This made about 4 inch diameter pancakes. If you want larger cakes use a larger measure. No matter what size they are, these blueberry pancakes are melt in your mouth goodness! Do you make pancake and what do you call them? I've heard them called hot cakes, griddle cakes, flap jacks, pancakes; are there other names you've heard? Let me know!


Wednesday, February 18, 2009

Parmesan Chicken Breasts

I always have boneless, skinless chicken breasts on hand for quick and easy meals. When they go on sale at the store I buy them and stick them in the freezer and that helps to keep the grocery bill down. They are versatile, quick cooking and have been a life savor for me many times! Normally, I marinate the chicken for a short while, but I didn't this time, and they were still juicy and flavorful! The key to even cooking is to pound the breasts to make them the same thickness. To do this, take a piece of plastic wrap and lay it in your cutting board. Lay 1 breast on it and then cover the chicken with more plastic wrap. Using the blunt end of your meat tenderizer, pound the thickest part of the breast until you get the whole piece about the same thickness. You can also use your rolling pin to do this and it works really well. That's what I used. Repeat with the rest of the chicken. Now you are ready for the coating. This coating is enough for 4 boneless breasts.
PARMESAN CHICKEN BREASTS
4 boneless, skinless chicken breasts
1/2 cup of dry bread crumbs
1/2 cup grated Parmesan cheese
1/2 tsp. sea salt (or any salt you want)
3/4 tsp. dried oregano
1/2 tsp. dried thyme
1/4- 1/2 tsp. garlic powder
1/4 tsp. black pepper
2 Tbs. melted butter or olive oil (I used butter this time)
Preheat oven to 425 degrees. Grease a baking sheet.
Mix breading ingredients in a pan or bowl. Melt butter in another bowl. If the chicken breasts are wet, dry them with paper towels, lay them between plastic wrap and pound to an even thickness. Taking 1 chicken breast, dip in melted butter, shaking off excess, and then roll in the breading mixture. Place on the baking sheet and repeat with the rest. I topped each breast with 3 or 4 small shavings of cold butter. Bake at 425 for about 15 min. or until juices run clear. Do not over bake! The chicken pieces I used were somewhat large, but after pounding they were 1/2-3/4 in. thick, so they don't need to bake for along time. Chicken should feel firm when done, and when in doubt, I usually make a small cut in one to see if the juice is pink or clear. I served the Parmesan Chicken Breasts with brown rice and steamed broccoli, but they will go with many side dishes dishes. Enjoy!

Tuesday, February 17, 2009

Fresh Broccoli and Cauliflower Salad

After our oldest son got married almost 6 years ago, he began asking for certain family recipes that he grew up with. I began to see a need to get all of my family recipes organized, as many of the the dishes I make are not written down on paper, but instead written in my memory, and that isn't a safe place! I have so many of my own tried and true , but also those of my Mother's and mother in law's, and piles of untried recipes that I think I'll get around to "one of these days". This blog is really helping me to organize my written recipes. And those that are still in my mind, well, I'm working on them. This Fresh Broccoli and Cauliflower Salad recipe came from my Grandmother. It has been almost 30 years since she made it for the first time. My family had gone to my grandparent's home for Thanksgiving and my Grandmother had made this salad. We all loved it so much, that for many years we had to have it every holiday! I don't make it as often as I used too, as too many new recipes come along. But I made it this week, so I'll share it with you!

FRESH BROCCOLI and CAULIFLOWER SALAD
1 large head of broccoli, cut into bite size pieces
1 head of cauliflower, cut into pieces
2 carrots, peeled and thinly sliced
1 green bell pepper, sliced
1 onion, chopped ( I use 1/2 of a red onion)
2 celery ribs, sliced ( I didn't use celery)
Combine all the vegetables in a large bowl.
DRESSING
In a small bowl mix together;
8 oz. sour cream ( can use low-fat)
1 cup real mayo
1 envelope dry ranch dressing mix( use the Original mix)
Mix well and fold into the vegetables. Cover and refrigerate at least a couple of hours before serving. It's so good, with the tangy dressing over the fresh, crunchy veggies! However one of these days, I'm going to experiment with the dressing, trying fresh herbs in place of the powdered ranch. But that's for another day.

Friday, February 13, 2009

Chocolate Surprise Cupcakes

I'm still on a chocolate high since yesterday's Truffle making, so thought I'd bake some Chocolate Surprise Cupcakes, which have a great chocolate flavor and a yummy surprise inside! Cheesecake! These luscious little snacking cakes have have a moist cheesecake filling in the center and they are so rich they don't need the traditional frosting. Just give them a light dusting of powdered sugar and you're good to go. Frosting would be way to rich. There is a trick, though, to getting a smooth top on which to put that powdered sugar. If you use too much cake batter on the bottom of the cupcake, then add a dollop of cream cheese batter, and then you maybe don't have enough chocolate batter to cover very well, you might get crevices in the cupcakes!
Yea, I got some crevices. Oh well, these are snacking cakes and they don't have to be perfect, right? They are still really good. Try them, your family will love them, if they love cheesecake filling, that is.
Chocolate Surprise Cupcakes
FILLING:
1 package(8 oz.) softened cream cheese
1/3 cup sugar
1 egg
1/2 cup chocolate chips
CUPCAKES
2 squares unsweetened chocolate, melted
1/3 cup oil
1& 1/4 cups flour
1 cup sugar
3/4 cup water
1 egg
1 tsp. vanilla
1/2 tsp. baking soda
1/4 tsp. salt
Heat oven to 350 degrees. Beat cream cheese, 1/3 cup sugar and 1 egg until smooth. Add chocolate chips and set aside.
Beat the cupcake ingredients together with a wire whisk until smooth. Spoon 1/2 of the batter into 18 paper lined muffin cups. Top each with 1 Tbsp. filling. Spoon the remaining chocolate batter over each one. Bake at 350 degrees for 30-35 min. or until a toothpick inserted comes out clean. I prick 1 cupcake from each pan just to make sure the filling is done.

Cool completely and then lightly dust with powdered sugar. This recipe came out of a Brand Name Bake Sale Cookbook that I purchased for my daughter a few years back. I hope all of you have a wonderful Valentine's Day tomorrow! Comments are always welcome and enjoyed!


Thursday, February 12, 2009

Truffles!


I have wanted to make Truffles for along time, so when I opened the Parade Magazine out of Sunday's paper and saw this recipe , I knew I needed to make them now! Or at least this week since it is almost Valentines Day. This recipe is from Dorie Greenspan and was so simple to do and it didn't make a huge amount. Since I am a chocoholic, I didn't want tons of chocolate hanging around my house because I get tempted; and then I give in! I did add vanilla to the recipe and then I decided that I ought to make some with almond flavoring too, and I'm glad I did as they are wonderful! So to begin with, I toasted about 4 Tbsp. of sliced almonds. Actually, I burned them to a crisp, so I started over. When toasting nuts, don't leave their side; watch them closely as they toast really quick! So, I toasted 4 more Tbsp. of sliced almonds. Let them cool and then chop them finely and put in a small bowl. Next, I needed unsweetened cocoa


powder, so, I sifted some in another small bowl. After that is done you may start the Truffles.

Truffles


1/3 cup heavy cream


6oz. dark chocolate ( semi-sweet or bittersweet), finely chopped


2 Tbsp. butter, very soft


1/2 tsp. vanilla ( or 1/2 tsp. almond flavoring if making almond truffles)


unsweetened cocoa powder ( or toasted, chopped almonds if making almond flavored truffles)

In a small sauce pan bring the cream to a boil and pour it over the chopped chocolate; let set for a min., then whisk until mixture is smooth. Whisk in the butter and the vanilla completely; cover and refrigerate for about 3 hours, or until firm.


Scoop out teaspoonfuls of chocolate, then squeeze and roll them between your hands to form cherry sized balls. This is rather messy, and mine were not perfectly round because the chocolate begins to melt, so work fast! If the chocolate is too hard to roll, leave it on the counter for 20 min. or so, then roll. Roll balls in cocoa powder, shake off excess powder,and place on plate or in container. Cover and refrigerate until ready to eat! To make the almond truffles, add 1/2 tsp. almond flavoring to the chocolate mixture. Roll the chocolate balls into the chopped almonds

and place in an airtight container and store in the fridge. I made the Almond Truffles as I knew my husband would prefer them to the others. Both flavors are so creamy, they just melt in your mouth! I'm not sure which flavor is my favorite. I'm leaning toward the almond, but both are delicious! Give them a try! Just don't burn the nuts!


Tuesday, February 10, 2009

Tortilla Soup with Chicken and Lime

When the weather is cold, my favorite food is soup, especially a hearty soup that can stand alone as a meal. A steaming bowl of soup and some crusty bread is all it takes to make me happy when those cold winds blow! I found this particular recipe at Epicurious, but it seemed lacking in substance, so I have adapted it to our preferences. The base recipe had a really great flavor, but just wasn't hearty enough for me, so of course I added some extra veggies and some black beans. If you like it spicier than I do just add some sliced peppers to heat it up a notch. This Tortilla Soup also needs the baked tortilla strips, so don't leave them out, as they are so easy to make. Also, you may choose to saute the onion and garlic in 1 tablespoon of olive oil , or you can just throw it all in the pot to cook. It's tasty either way!

Tortilla Soup with Chicken and Lime
For the tortilla strips you need 4-5 corn tortillas. Brush 1 side of tortillas lightly with olive oil and cut in half. Stack halves and cut crosswise into 1/4 inch wide strips. Spread strips on greased baking sheet and bake at 350 until golden, about 15 minutes. Cool on baking sheet.
You also need;
2 14& 1/2 cans of low- salt chicken broth
3 cups water
1 can of Rotel Tomatoes ( chopped with chilies; I use Mild)
1 bay leaf ( I forgot it)
1 garlic clove, pressed
1/8 teaspoon dried crushed red pepper, if desired
1/2 teaspoon ground cumin
3 skinless, boneless chicken breast halves, cut into 1/2 in. wide strips
1 med. onion, finely diced
1/2 bell pepper, diced
1 large carrot, diced
1 small zucchini or yellow squash, quartered and sliced
1 &1/2 cup frozen corn
1 can of drained and rinsed black beans
1/4 - 1/2 cup chopped fresh cilantro
4 tablespoons fresh lime juice
If desired, saute onion and garlic in 1 t. olive oil. Add all ingredients to pot, EXCEPT the black beans, cilantro and lime juice. Simmer about 20- 30 min. Add the beans, cilantro and lime juice and salt and pepper to taste. Adjust seasonings. Ladle soup into bowls and sprinkle with tortilla chips.
CORRECTION! I wrote down 4 cups of water when it should have been 3. Sorry!

Monday, February 9, 2009

Snickerdoodles

I love Snickerdoodles, those sugar cookies dusted with cinnamon, that are one of my family's favorite cookie. I 've been making them for a long time, following a recipe I found years ago in an old church cookbook. They are melt in your mouth deliciousness, (is there such a word?), especially when baked just enough to be soft and chewy. However, those times that I have over baked them a tad, I found that they are really good when they are crunchy too! I'll take them either way. After the cookies are stirred together, the dough must be refrigerated for about 2 hours, or overnight. When ready to bake, remove the dough from the fridge and roll
into balls. To make the balls uniform in size, I use my tablespoon to scoop the dough, just filling it. Then I roll the dough into small balls between my hands and then roll them into a mixture of sugar and cinnamon and place them on a baking sheet, not crowding them. You must give them room to spread, because as they bake they spread out and puff up and you don't want them to be deformed because of crowding. The Snickerdoodles will appear to be "crinkled" on top and if you want them to be soft and chewy, they will still look a little wet when removed from the oven.

They will flatten out during cooling. Also, they do better if when you take the pan out of the oven, let the cookies rest on the pan a few seconds and then remove them to a wax paper lined pan to cool. Snickerdoodles tend to fall apart when placed on wire cooling racks. So, let's get busy!
Snickerdoodles
In a large bowl, cream together:
1 cup soft butter (or you may use shortening)
1 &1/2 cups sugar
2 eggs
In another bowl sift together:
2 &3/4 cup flour
2 teaspoons Cream of Tarter ( found on the spice isle at the market)
1 teaspoon baking soda
1/2 teaspoon salt (if using salted butter, use only 1/4 tea. salt
Stir dry ingredients into butter mixture. Cover bowl with plastic wrap and chill in fridge for at least 2 hours. When ready to bake preheat your oven to 400 degrees. Roll dough into balls the size of small walnuts. I use my tablespoon measure to make sure the cookies are similar in size. Roll each ball of dough into cinnamon sugar mixture made with 1 tablespoon sugar and 1 teaspoon cinnamon. Place balls about 2 inches apart on ungreased cookie sheet and bake at 400 degrees for about 10 minutes for soft cookies. The Snickerdoodles will still look wet. Remove from oven, let rest on pan for just a few seconds, then remove cookies to waxed paper to cool. Or, you can just eat them warm from the oven. They are so good! What are your favorite cookies to make?

Friday, February 6, 2009

Polish Sausage and Peppers


My husband is home everyday for lunch and not for dinner, because of the hours he works. In the evening, I usually have 1 or 2 of our children here to eat. They are in the college age and working stage of their lives, so sometimes one, or both may give me a call saying they won't be here for dinner. At least they call! What I'm trying to say is that it won't be too long until I will be cooking for two most of the time, unless it's Sunday dinner after church when all three kids are almost always here! Today for lunch I made Polish Sausage and Peppers, and served it over rice. I've made this before and it's quite versatile, as you can substitute sausage made with turkey or chicken, or even Italian sausage. I've served it over either white or brown rice, or pasta, and it's good both ways. Today, I made just enough for 2 servings, so you may have to increase the amounts if you are feeding more people.

Polish Sausage and Peppers

You will need 1/2 pound of rope Polish Sausage, sliced in about 1/2 inch slices; 1/2 of a green bell pepper, cut into strips; 1/2 of a yellow bell pepper cut into strips; 1/2 of a red onion, sliced, and 1 Roma tomato, coarsely chopped.

I used 1/2 cup of rice to 1 cup of water or broth and combined in a sauce pan. Add 1 teaspoon oil and simmer, covered for 15 min. Remove from heat. It will continue to steam while your finishing the sausage and peppers. In a skillet in 1 tablespoon of olive oil, lightly brown the sausage for 2 or 3 minutes and then add the peppers and the onion and stir. Add a couple of tablespoons of water or broth and cover skillet with lid. Let simmer for about 5 minutes and then check to see if the peppers are as tender as you want them and make sure the skillet is not dry. You want a little bit of liquid to use on the rice. Add the chopped tomato and give it a stir and cook until tomato is heated through. I did not use salt or pepper because the meat was salty and plenty spicy. Serve over rice or pasta. This takes only about 20 minutes to prepare!
This can also be served on toasted hoagie rolls with melted cheese for a great sandwich!

Thursday, February 5, 2009

My First Awards!


I want to thank Judy, from Judy's Kitchen for my first awards! Judy has a fantastic food blog with just about any type of food you could want! She is the food editor of her local newspaper and she has such a positive attitude and great recipes.When accepting these awards, we must pass them on according to these rules:


1. Put the logo on your blog or post
2. Nominate at least 10 blogs which show great attitude and /or gratitude
3. Be sure to link to your nominees within your post
4. Let them know that they have received this award by commenting on their blog
5. Share the love and link to this post and to the person from whom you received your award!

I'm passing these awards on to the following blogs;
1. My Kitchen Cafe
2. The Friday Friends
3. Real Mom Kitchen
4. For the Love of Cooking
5.It's all Gouda
6. The Wives with Knives
7. One Perfect Bite
8. Erin Cooks
9. 50's Housewife
10. Jayhawk Girls Kitchen

If you can, check out these blogs because they're really great! thanks again Judy!


Wednesday, February 4, 2009

Oven Roasted Broccoli


Last year I began experimenting with roasting veggies in the oven and found that I loved them prepared that way! I've already posted Sweet Potato Oven Fries, so today I'm ready to talk broccoli. I love broccoli steamed; it's been my favorite for years, but when you roast it in the oven it gives it a new depth of flavor! Depending on how long you roast the broccoli, it can have a slightly nutty, sweet, caramelized flavor and the little buds get a little crisp and OH SO YUMMY!

Normally, when I fix Oven Roasted Broccoli, I just cut the broccoli and lay it on a pan, drizzle a little olive oil over it, sprinkle with kosher salt and bake it at 425 degrees for 10 -15 min. This time I decided to saute some garlic in the olive oil before hand and My husband and I loved the extra kick of flavor! I also added some Parmesan Cheese at the end, which was OK, but didn't affect the dish that much. I don't know if I'll add it next time.


Oven Roasted Broccoli

Wash 1 head of broccoli and drain thoroughly. Cut through stalks of broccoli and pull apart into the size of broccoli spears you want and place in a bowl. In a small skillet, in 2 T. olive oil saute 1 or 2 minced cloves of garlic (I used 1 large clove), until it just begins to get soft and you can smell the garlic. Pour the oil over the broccoli, stir, and dump the broccoli on a baking sheet. Arrange broccoli spears in a single layer and sprinkle with kosher salt. Bake at 425 degrees for 10- 15 min. until stalks are tender crisp when stuck with a fork. The flower buds should be beginning to brown. The aroma coming from your oven should be heavenly! Remove from oven and eat immediately! Or, you can add a little Parmesan cheese, give it a toss, then eat! Do you like roasting vegetables in the oven?
And a big THANK YOU to all of you who have commented on my blog so far! I appreciate you all so much!