Tuesday, April 9, 2013

Blueberry Pie Bars

 If you love blueberries, and you love pie you will be thrilled with this yummy recipe for Blueberry Pie Bars. The blueberries are in a creamy filling and surrounded by a crumb style crust. When I saw the recipe last week, I knew I had to make them immediately. The bottom crust is pretty sturdy to hold the filling and there is a thin layer of crust on top also. These blueberry treats are a definite winner in our household. I hope you give these delicious treats a try.
Blueberry Pie Bars
Adapted from a wonderful blog, Annie's Eats. She used blackberries instead of blueberries.

Ingredients:
For crust and topping-
1 1/2 cups all-purpose flour
3/4 cup sugar
pinch of salt
zest of half a lemon
3/4 cup (12 tbsp.) unsalted butter

For the filling-
2 large eggs
1 cup sugar
1/2 cup Greek yogurt or sour cream- I used vanilla Greek yogurt
6 tablespoons flour
pinch of salt
juice of half a lemon
1 teaspoon vanilla-I omitted since I used vanilla yogurt
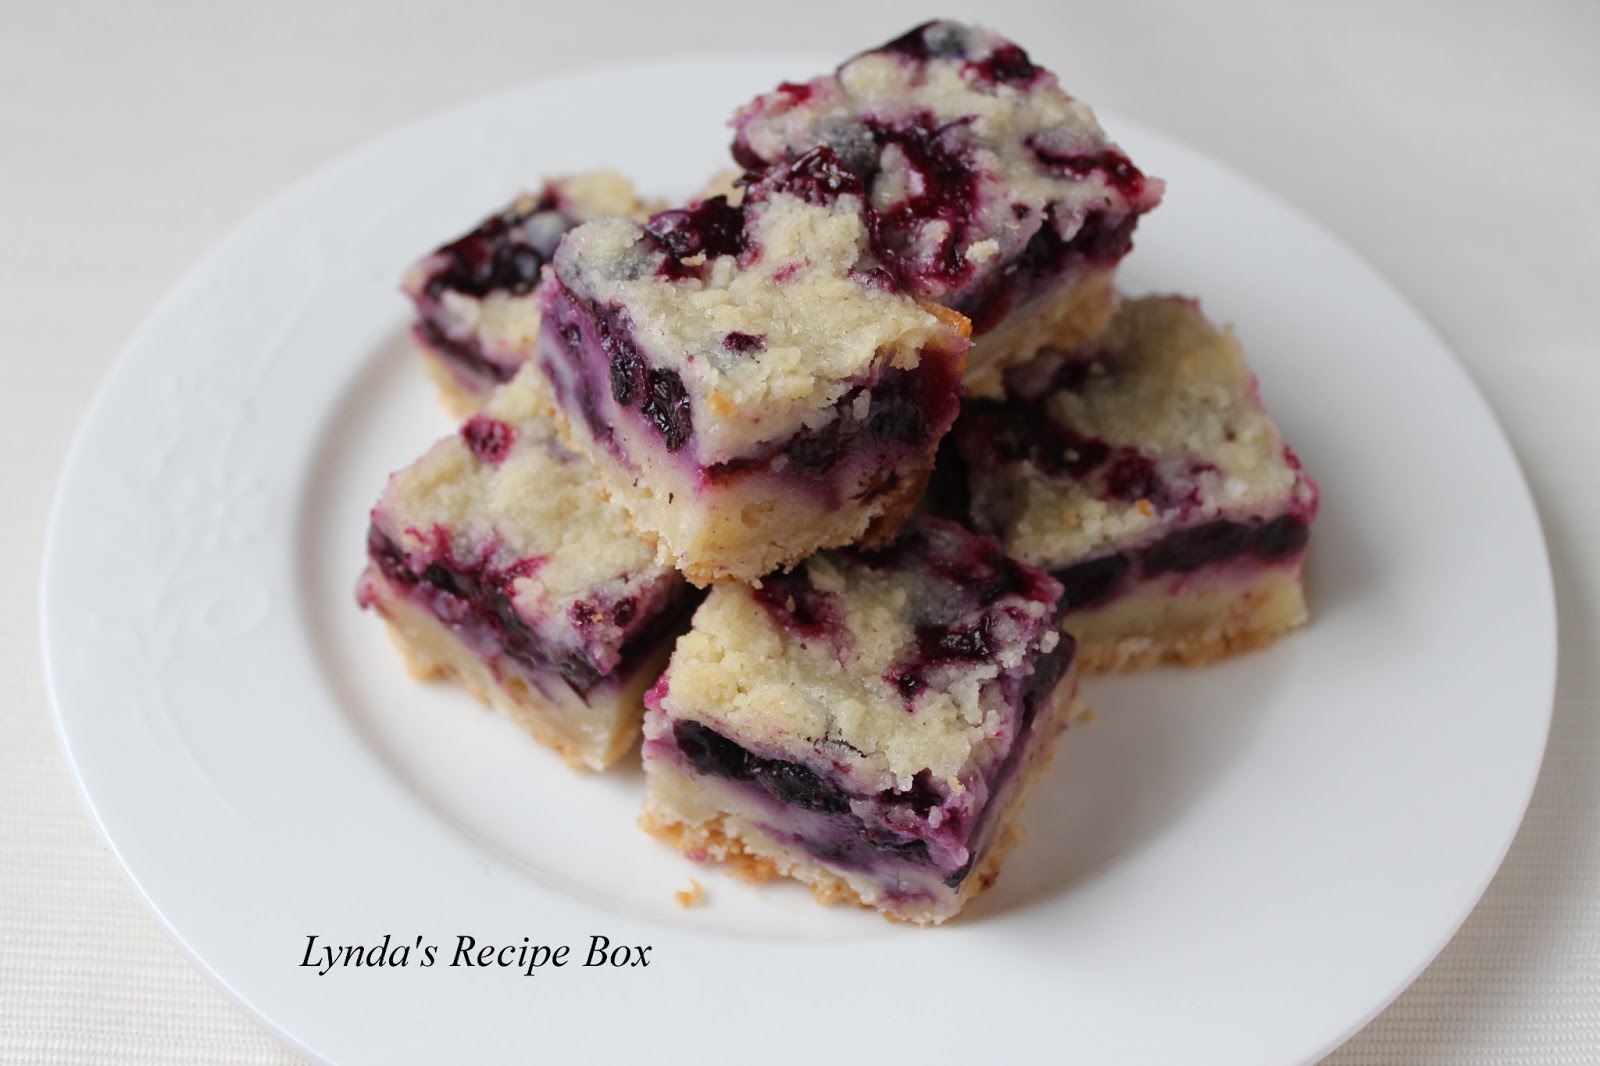
15-16 ounces fresh blueberries (can use frozen if they have been thawed and drained of excess juices)

Directions:
1. Preheat oven to 350 degrees F. Line a 9x9 inch baking pan with foil and spray with cooking spray. In the bowl of a food processor, combine the flour, sugar, salt and zest. Add the cold butte and process pulse in short bursts until the mixture is crumbly.

2. Reserve 3/4 of the mixture to use as topping. Add the rest of the crumb mixture to the prepared pan and press to form an even layer of crust on bottom of pan. Bake 12-15 minutes until light golden. Let cool 10 minutes before proceeding.

3. In a medium bowl. make the filling. Combine eggs, sugar, yogurt (or sour cream), flour, salt lemon juice and vanilla. Whisk until smooth. Gently stir in the blueberries. Spread the filling over the pre-baked crust. Crumble the reserved topping evenly over the filling.

4. Bake until the top is beginning to brown and the bars are just set, about 45 minutes. Let cool completely on a wire rack. Chill to firm up the bars before slicing and serving. Enjoy!

Thursday, April 4, 2013

Basic Homemade White Bread

 Does anything smell better than bread baking in the oven? I think not!
So yesterday, I made this fantastic white bread that I have had bookmarked forever it seems like, and my house smelled heavenly with the aroma of freshly baked bread. This simple white bread has a tender, moist, but sturdy crumb, and makes the most wonderful toast. I can't wait to make grilled cheese sandwiches with it too.
I must admit to an accident though. When taking the bread out of the pans, I dropped a pan and it landed upside down on a chair! Thankfully not on the floor, but the top of the bread was torn up some. sigh~ So we ate that one first. I don't know if I've ever mentioned what a klutz I am; now you know.
 Anyway, these loaves are delicious to eat, easy to cut and make wonderful toast and sandwiches. Just what I was looking for in a homemade white bread. And the dough was so easy to work with. I used my mixer to stir it up, (and I about killed my hand-mixer) and then kneaded it for about 5 minutes. It only bakes for about 30 minutes so this bread was ready in time for lunch. I hope you'll give it a try!
Basic White Bread
Adapted from this wonderful blog, Living in the Kitchen with Puppies. Natasha adapted it from Bernard Clayton's New Complete Book of Bread.

5 cups bread flour (all-purpose flour can be used)
3 tablespoons sugar
2 teaspoons salt-I used fine sea salt
1 package Quick Rise yeast (2 1/4 teas.)
2 cups whole milk, warmed to about 120 degrees
3 tablespoons melted shortening, cooled

Directions: The recipe is originally mixed with a stand mixer, (but I used and almost killed my hand mixer). *Directions for stand mixer below.
1. Grease 2 loaf pans.
2. Put all ingredients into a large bowl. If mixing by hand, use 4 1/2 cups flour to start and add the extra 1/2 cup as needed. Stir bread well until it comes together. Turn dough out on a lightly floured surface and knead for about 5 minutes. Dough will come together in a nice ball and be very workable.
3. Place dough in a greased bowl and let rise until doubled, about 1 hour. If kitchen is cool, it can take longer to double.
4. When dough has doubled, punch down. That release the air in the dough. Now divide the dough evenly in half. Shape each half in an oval, then roll ups and tuck the ends under. Lay into greased loaf pans. Cover and let dough rise about 45 minutes.
5.Preheat oven to 400 degrees F. Bake bread for 10 minutes. Then reduce the temperature to 350 degrees and bake another 20 minutes. Internal temperature on bread should be 200 degrees F. When done, and loaves should sound hollow when tapped on bottom. Remove bread  (carefully), from pans and cool on wire racks. Enjoy!

*If using a stand mixer, mix with dough hook for 3 minutes to combine, and then 5minutes to knead. Then turn dough out on a floured surface and knead until it forms into a soft ball. Follow remaining directions above.

Sunday, March 31, 2013

What to do with left-over Ham

Our family Easter dinner was last night and I didn't get any pictures of our ham. Sorry, it was beautiful, delicious and everyone was hungry. So we ate. I baked a ham and I'll just have to bake another soon, when I can take pictures. But we have plenty for some great tasting leftovers, that won't taste like leftovers. Sandwiches are wonderful, but here's some other ideas if you have a good portion of ham hanging out in your fridge.
 Scalloped Potatoes and Ham are awesome. Really, this is a dish that's easy to overindulge in. I have to be very careful because it is so delicious!
 White Beans and Ham Soup. I use great northern dried beans for this hearty dish.
 Asparagus, Ham and Fried Egg Stacks. So yummy and perfect for breakfast, lunch or dinner.
 Red Beans and Rice. If your craving a little southern comfort, then look no further. Spice it up as much as you like.
 I love a good Western Omelet, made with ham or bacon. Perfect for anytime of day.
 Green Beans and New Potatoes. Of course this dish is best with garden beans, but I froze my ham bone to use for the season's first green beans. Don't ever throw out your ham bone! Just wrap it in plastic wrap, then in heavy foil or put it in a freezer bag. Date it and freeze to use in green beans, or soup. It will last several months in the freezer.
 
And this is a tree, not food. I was outside today and it is so beautiful that I had to take some pictures. It is 70 plus degrees and gorgeous! Our trees are beginning to bloom. Spring just may have arrived, for a few days anyway.
I hope you all have had a fantastic Easter and hopefully you've  found some good ham recipes. Love to my readers!


Friday, March 29, 2013

He did it for us!

Have a blessed Good Friday! Remember the sacrifice that Christ made for us.

Tuesday, March 26, 2013

The Best Cheesy Broccoli and Rice Casserole (No canned Soup!)

 If you would like a really creamy, really cheesy Broccoli and Rice recipe, look no further. This awesome recipe is the best I've ever had, and there is absolutely no canned soup involved. I made it this week and my husband and I both loved it's creaminess, with lots of broccoli goodness and great cheese flavor too. I won't make any other, ever. In my early married years I made the old canned soup version, but it doesn't hold a candle to the real thing. I used to always serve Broccoli and Rice Casserole at Easter dinner, and sometimes for other holidays too. Broccoli is a great spring vegetable, even though it is readily available all year long now. I love it raw, in salads and in casseroles. It is my all time favorite veggie. Anyway, I hope you'll give this recipe a try; it's really delicious and addictive.
Cheesy Broccoli and Rice Casserole
Adapted from Mel's Kitchen Cafe (which she adapted from Cook's Country)

Ingredients:
For topping;
2/3 cup Panko bread crumbs
3 tablespoons melted butter
1/4 cup freshly shredded Parmesan cheese
1 clove garlic, minced
For casserole;
2 pounds broccoli- (about 3-4 heads), florets cut into 1 inch pieces and stems chopped
2 tablespoons butter
1 medium onion, finely diced
1 1/4 cups long grain white rice
4 cups low-sodium chicken broth
1 1/4 cups half and half
3/4 teaspoon salt
about 1/4 teaspoon black pepper (subbed for 1/8 tea. cayenne pepper)
2 cups shredded extra sharp cheddar cheese
1/2 cup shredded Parmesan cheese

Directions:
1. Place oven rack in center position and preheat oven to 400 degrees. Grease a 9x13 inch baking dish. In a small bowl combine the panko crumbs, melted butter, 1/2 cup grated Parmesan and garlic. Set aside.
2. Microwave broccoli florets (save stems for later), covered in a large bowl until bright green and tender, 2-3 minutes. Be careful to not overcook. Melt the 2 tablespoons butter in a large pot over medium heat. Cook onion and broccoli stems until softened and tender, about 8-10 minutes. Add rice and cook stirring, about 1 minute. Stir in broth and half and half and bring to a boil. Reduce heat to medium-low and cook until rice is tender. Be sure to stir rice often. Cook for 20-25 minutes. Off heat, stir in the salt, pepper, cheddar and Parmesan cheeses, and the broccoli florets. Pour the mixture into the prepared baking pan. Top with the reserved panko crumb mixture and bake until the sauce is bubbly and the top is golden, about 15 minutes. Cool 5 minutes. Serve and enjoy!

Note: This dish can be prepared ahead of time. Follow recipe instructions. After pouring the mixture into the baking dish, cover it with plastic wrap and refrigerate up to 8 hours. Store the crumb mixture in a separate container in fridge. Before baking, sprinkle the crumbs on top of casserole. Bake at 375 degrees for 25-30 minutes until hot and bubbly.

Sunday, March 24, 2013

Skillet Chicken, Broccoli, and Penne

 I just love a good one pot meal. In this case it is a yummy skillet meal with thin slices of chicken, penne pasta, tender-crisp broccoli with an easy and delicious sauce. This meal is easy to put together and perfect for a weeknight dinner. The only problem with this recipe is that the broccoli tends to fall apart a little as you stir the Parmesan into the dish at the finish. So if that bothers you too, you can cook the broccoli separate from this dish. Either way, this is a real tasty meal that I've made several times. Hubby also gives a thumbs up! Here's the recipe.
Skillet Chicken, Broccoli, and Penne
Adapted from The Best chicken Recipes, by Cook's Illustrated
I replaced the wine in this recipe with more chicken broth, and used Penne instead of the Ziti that was called for.

Ingredients:
4 tablespoons olive oil
1 pound boneless, skinless chicken breasts, sliced thin
1 medium onion, minced
1/4 salt
6 garlic cloves, minced or pressed
pinch of red pepper flakes
2 1/2 cups low-sodium chicken broth
2 cups water
8 ounces penne pasta
8 ounces, about 3 cups, broccoli florets
1 cup freshly grated Parmesan cheese (2 ounces)

Directions:
1. Heat 1 tablespoon oil in a 12 inch skillet(non-stick, if you have one. Mine is stainless steel and it worked ok). Add the sliced chicken and break it up. Don't stir-let the chicken brown for about 1 minute, then stir and break it up. Cook and stir for another 2 minutes until chicken is done. Transfer chicken to a bowl; cover to keep warm.
2. Add 1 more tablespoon oil to the skillet and the onion and about 1/4 teaspoon salt. Cook over medium heat until onion is softened, about 5-7 minutes. Stir in the garlic and pepper flakes and cook about 30 seconds until fragrant. Stir in the broth, water and pasta. Increase the heat to high and cook, uncovered, for 12 minutes, stirring often so pasta doesn't stick to pan. Add the broccoli and simmer for 4-5 minutes, until tender crisp and the liquid has thickened some.
3. Return the chicken to the skillet and heat until it is warmed through. Off heat, stir in the remaining 2 tablespoons olive oil and the 1 cup of Parmesan. Season with salt and pepper to taste. Great with crusty bread and a salad. Enjoy!

Monday, March 18, 2013

Oatmeal Scotchies with Pecans

 Like a delicious oatmeal cookie? Well these Oatmeal Scotchies with Pecans are so good, fantastic really, and also so rich. My husband loves anything butterscotch, so I made these just for him as they are one of his favorite cookies. I had intended to make Peanut Butter Cookies, but hubby had these goodies on his mind instead. This recipe makes too much for us, so anymore I just freeze half of the cookie dough for a later use. But they are also a great gift for any cookie lovers you may know! Here is the recipe.
Oatmeal Scotchies with Pecans
Adapted from Nestle - I increased the cinnamon and added pecans to the recipe. The cookie dough freezes well, if you don't want to bake the whole recipe.

Ingredients:
1 1/4 cups all-purpose flour
1 teaspoon baking soda
1/2 teaspoon salt
1 teaspoon cinnamon
1 cup butter, softened
3/4 cup granulated sugar
3/4 cup brown sugar, packed
2 large eggs
1 teaspoon vanilla
3 cups of quick cooking oats (or may use old fashioned oats)
11 ounce package of Nestle Butterscotch Morsels
3/4 cup coarsely chopped pecans

Preheat the oven to 375 degrees F.
In a small bowl combine the flour, soda, salt and cinnamon.
In a large bowl cream the softened butter with the sugars. Stir in the eggs and vanilla until well combined.
Gradually  beat in the flour mixture. Stir in the oatmeal, butterscotch morsels, and the pecans.
Drop dough by rounded tablespoon onto ungreased baking sheets.
Bake for about 7-9 minutes for chewy cookies. Cool cookies on baking sheets for about 2 minutes; then remove to cooling racks. Enjoy! Makes about 4 dozen.